FavSync Knowledge Base
Coming Soon
General Info
The goal of FavSyncThe goal of FavSync is to provide your personal portal from where you can access all the things you need on the web and overview all your online activities in one place. FavSync is the key to everything you need on the web.
Things you can do with FavSync in a glanceFavSync Portal is an online service that allows you to:
- Access all your websites and all your content quicker
- Centralize all your online content in one place, accessible from anywhere and any device
- See an overview of your web activities in one shot. FavSync will notify you whenever you have a new message or a notification on your online services
- Single sign-on: store the login information of all the websites you use on FavSync, then just login once to FavSync and get automatically logged in to any website
- Create an unlimited amount of pages for different purposes, with different layouts and lots of customization
- Use FavSync portal as a starting page and access all the your most visited websites and bookmarks quicker
- Collect content together with friends and colleagues
FavSync will always remain free for personal use.
More professionals users will have an option to purchase our premium features.
Any data you store on FavSync will not be forwarded to any third parties. FavSync is only using users data ANONYMOUSLY for analytical purposes. You can read more about it under the Privacy section in our Terms and Conditions.
Why should I store my content on FavSync?While there are many ways to store your online content, FavSync is great at centralizing all the content in one place and making it easily accessible from anywhere.
The vast amount of the customization possibilities allows you to see your content in a clear way and find what you are looking for quickly.
FavSync does not only allow you to store content, but also provides you with an easier way to access everything you need on the web from one place.
FavSync is the only service that allows you to store your online content and access everything you need on the web from one place, with a signle-sign-on.
FavSync is also the only service that integrates with your browser on ALL levels: browser add-on, address bar integration, merging with Google results and the browser new tab.
FavSync is fully a cloud service. There is no need to synchronize or install anything in order to access your content from anywhere.
No backup is required neither, since your content is stored securely on our servers.
Chrome
FavSync website - V
FavSync add-on - V
FavSync new tab - V
FavSync Google results - V
Stay Updated Service - V
Password manager - V
Importing bookmarks - via the add-on or HTML file
Firefox
FavSync website - V
FavSync add-on - V
FavSync new tab - V
FavSync Google results - V
Stay Updated Service - X
Password manager - X
Importing bookmarks - via the add-on or HTML file
Internet Explorer 9+
FavSync website - V
FavSync add-on - X
FavSync new tab - X
FavSync Google results - X
Stay Updated Service - X
Password manager - X
Importing bookmarks - via HTML file only
FavSync and many other websites do not support Internet Explorer older than 9. Please do yourself a favour and update your browser.
Other browsers
FavSync website - V
FavSync add-on - X
FavSync new tab - X
FavSync Google results - X
Stay Updated Service - X
Password manager - X
Importing bookmarks - via HTML file only
Mobile devices
FavSync website - optimized for mobile
Mobile app - Android app is in beta and can be downloaded from Google Market.
iOS app will be available soon!
No, by default your content is not publicly accessible. FavSync gives you the possibility to publish any part of your content or on the contrary hide them under an additional password. Read more about Hidden Page and Public Page.
Can I login from different PCs? Simultaneously?Yes. There is no limit on the amount of devices you can login to FavSync simultaneously.
How safe is my content?FavSync takes security seriously, that is why our website is using HTTPS (HTTPS allows secure transactions) and sensitive data is encrypted.
When storing your items on FavSync, it is automatically backed-up on our servers and you can export it any time to a browser format HTML file for an extra backup of your own (currently only bookmarks can be exported).
None! FavSync can be used by anybody. We are trying to keep it simple, so that everyone can enjoy. FavSync also has tutorials for each feature to guide you how to use it.
Can I export my data and delete my account if I don't like FavSync?Yes, you can export your bookmarks at any time to a HTML file (that can be imported into any browser) or to an excel file. We are working to make the rest of the content exportable also. In case you would like to delete your account, you can do it through the account settings. ALL the data will be deleted then.
Can I try without signing up?Yes, click here.
Starting with FavSync
Items types
FavSync allows users to store the following items:
- Bookmarks
- Notes
- HTML Formatted notes
- Website in a frame (iFrame)
- News feeds (RSS)
- Images
- Video clips
- Lists or checklists
Every item type stores a different type of content and behaves differently.
Read more about it in the Items section.
There are many ways how you can add items to FavSync:
1. Through the FavSync page
Click here for more info
2. Through FavSync add-on
Click here for more info
3. Importing from a browser through the FavSync add-on
Click here for more info
4. Importing from a browser through a HTML file
Click here for more info
5. Importing from an Excel file
Click here for more info
6. Importing from another webpage
Click here for more info
7. Importing from Copy/Paste
Click here for more info
8. Through a virtual email
Click here for more info
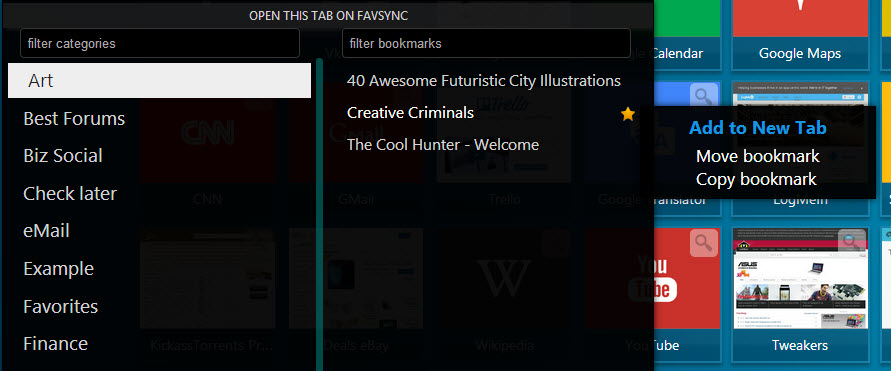
To edit or delete an item mouse over the item, a control panel will appear, choose edit or remove.

To move an item simply drag the item and drop it. You can move an item to another category, inside the same category or to another page. In some cases you can store the item as a Sublink.
Read more about Subilnks here
There are three ways you can import bookmarks:
1. Through the add-on - Chrome and Firefox only
Click here for instructions
2. By importing a browser format HTML file - any browser
Click here for instructions
3. By importing an excel file - any browser
Click here for instructions
There are multiple ways how you can access your content on FavSync:
1. Through the FavSync page
Click here for more info
2. Through FavSync top search
Click here for more info
3. Through the add-on* - by using the "Search FavSync" field
Click here for more info
4. Through the address bar - as you type in your search bar, results from FavSync and Google will appear *RECOMMENDED*
Click here for more info
5. Through the New Tab* - as you open your Chrome or Firefox new tab, FavSync items will appear
Click here for more info
6. Through Google results* - shown on the right side from the Google results, appears on every Google search
Click here for more info
*Chrome and Firefox only
**currently Chrome only
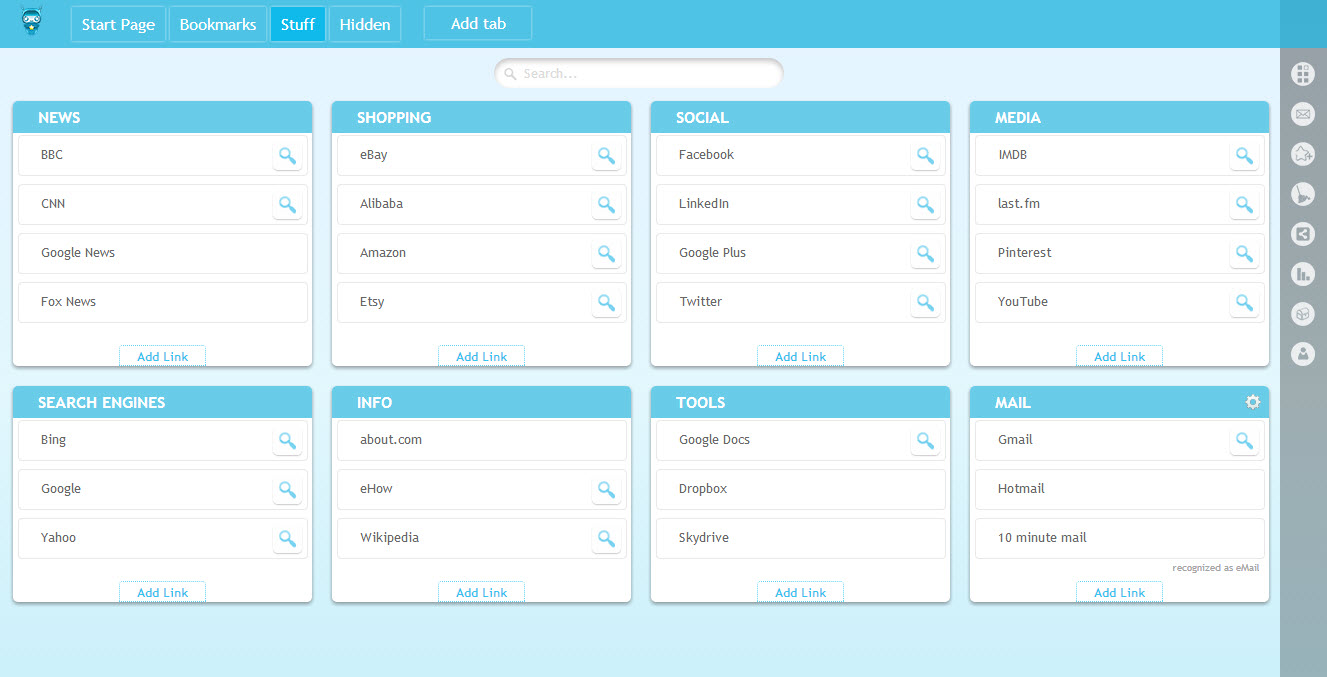
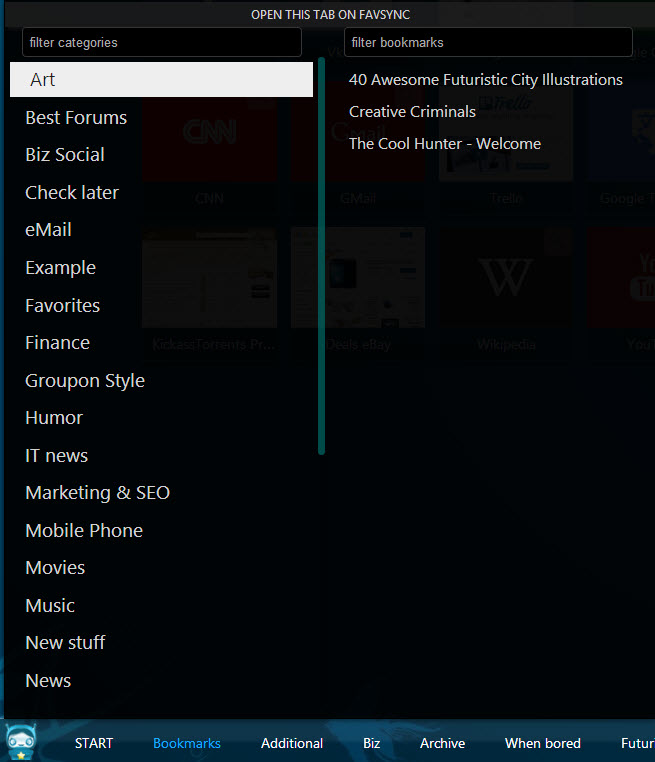
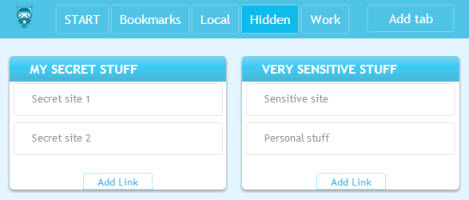
Pages are located on the top bar and allow you to store different types of content in each of them.
Every page can have a different layout and a different access level (Public Page or Hidden Page).
Example: START page - as a starting page with most visited websites.
Main page - main page with most of your online content stored on it.
Hidden page - for your sensitive stuff.
Archive page - for the stuff you don't want to delete completely.
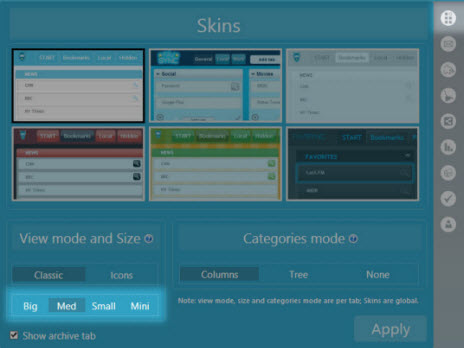
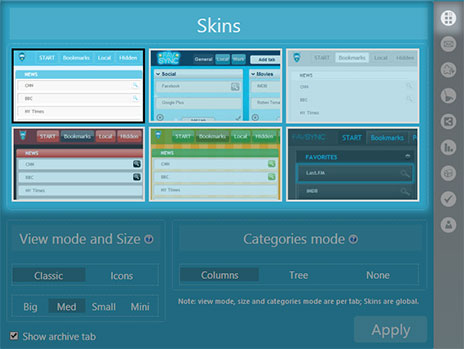
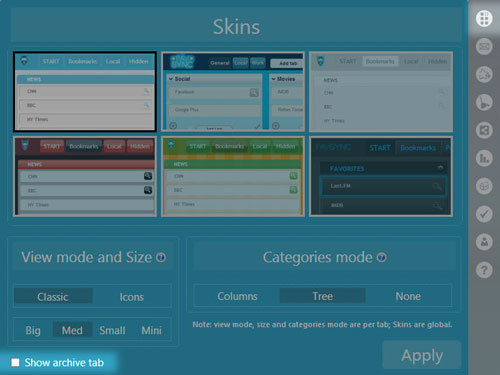
You can choose between six skins, two view modes, three categorization possibilities, four sizes and three sorting modes.
View mode, sorting, size and categories mode are per page; Skins are global.
Click here to read more about:
View modes
Categories modes
Size
Skins

View mode affects the presentation of the items in the currently opened page.
View mode Classic: The classic presentation of an item as a line with a title on it.
Useful for pages with lots of items.
View mode Icons: Every item will be presented as an icon with the title at the bottom. Bookmarks will be shown as a screenshot of the website, images will show a thumbnail of the image. All the other item types will have a fixed icon.
Icons view mode is a great visual way to see your items. However, pages with huge amount of items can become laggy.
You can combine between any view mode, categories mode and size.
To change a view mode click on the Layout icon, it will show the current view mode for this page. Choose another view mode and click Apply

Besides storing your content on different pages, there are multiple ways you can categorize it.
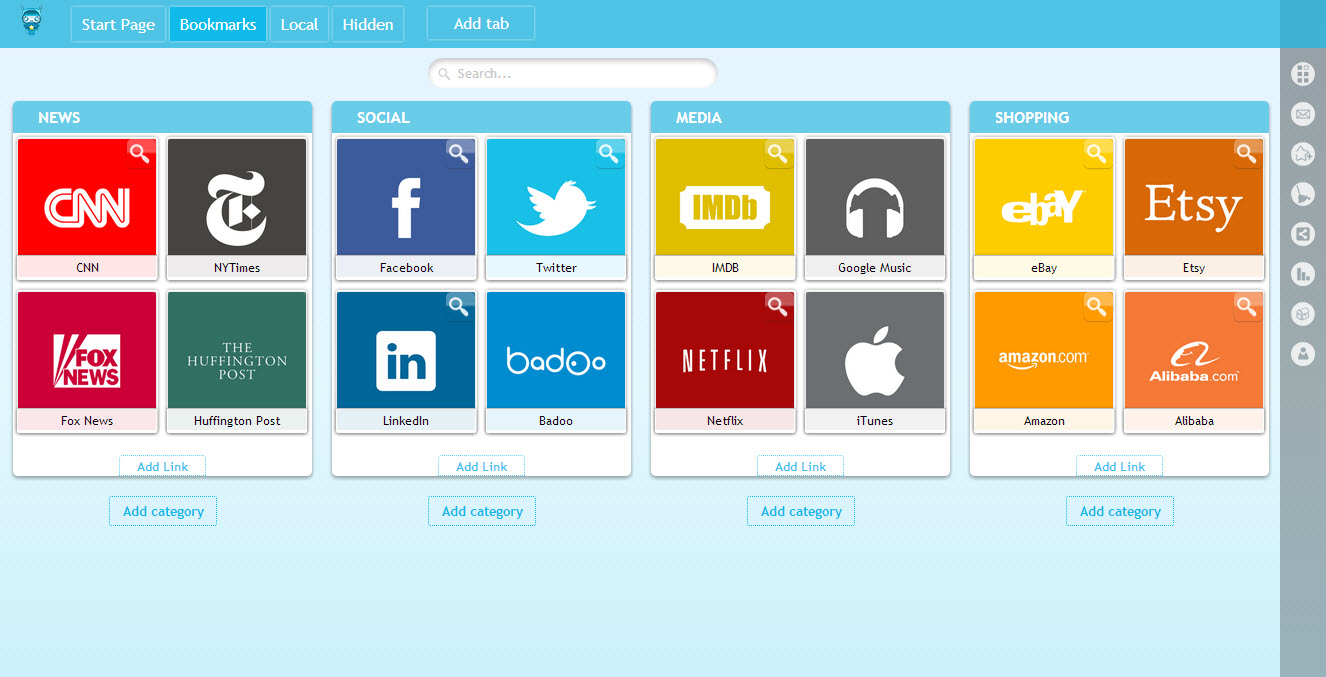
Categories mode columns: categories are presented as boxes and are stored in four columns. A category can be collapsed or expanded.
Great way to see lots of items in one shot. This mode does not support nested structure (subcategories).
Note: In this mode when lots of items are stored on a single page it can become laggy. You can adjust the amount of items shown per page at the bottom of the page. We recommend not to store more than 150 items per page.
s

Categories mode tree: the categories are presented as a tree on the left side and the items in the center.
This mode supports nested tree structure - storing a category under a category.
Useful for complicated nested categories structure where seeing all the items at once is not necessary.

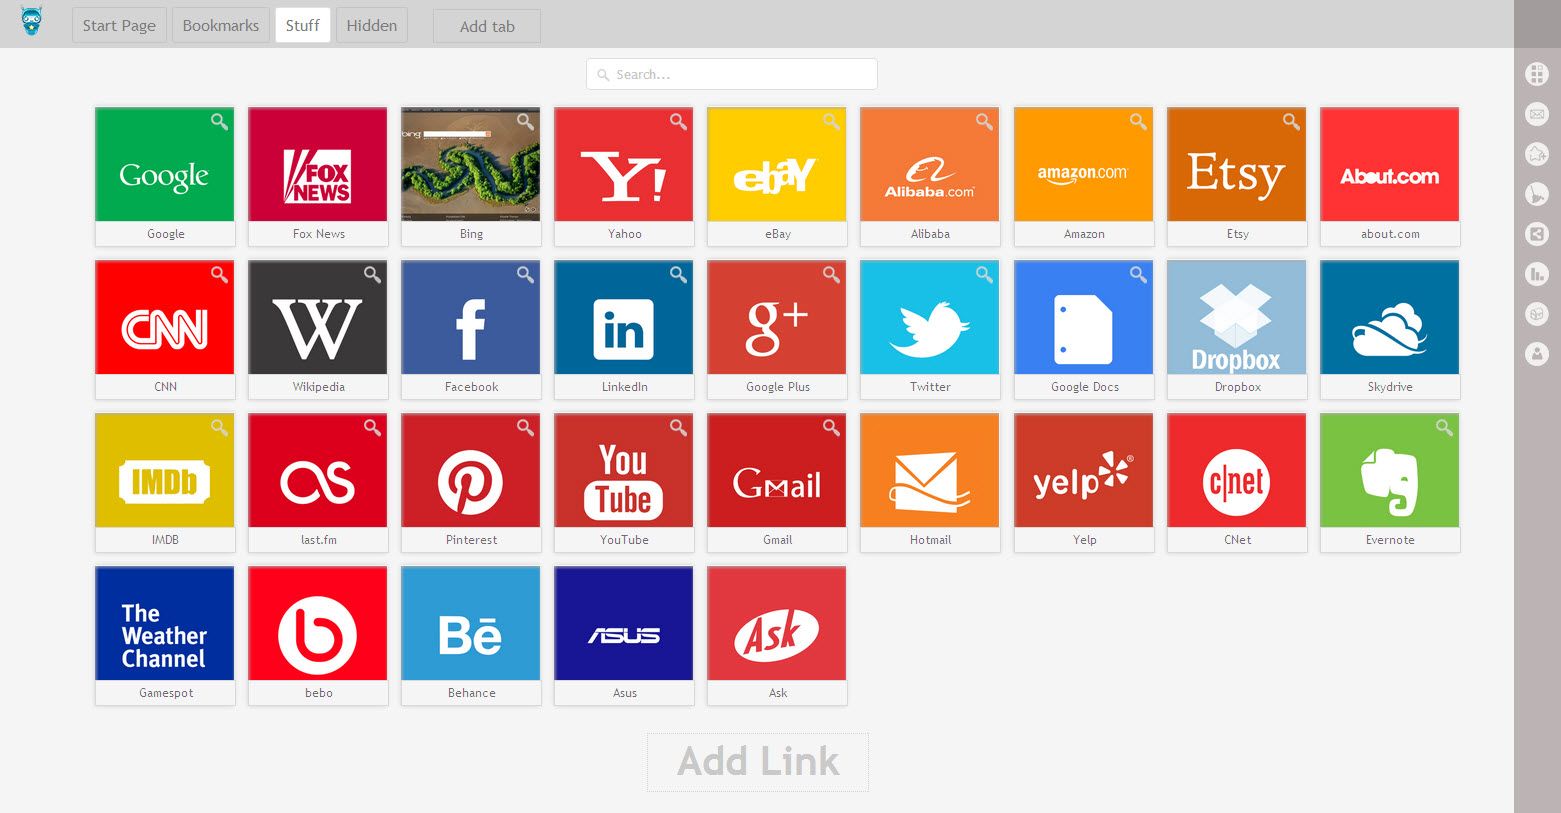
Categories mode None: this mode contains no categories, a simple list of items instead.
Useful when categories are not required, for example as a start page or most frequently used bookmarks and items.
You can combine between any view mode, categories mode and size.
To change a categories mode click on the Layout icon, it will show the current categories mode for this page. Choose another categories mode and click Apply
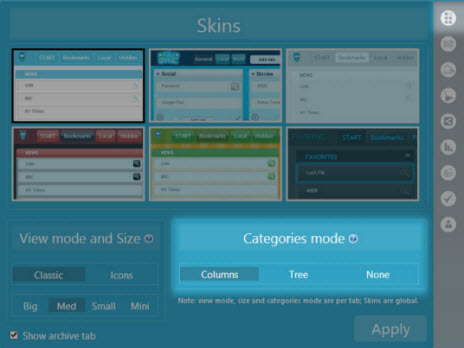
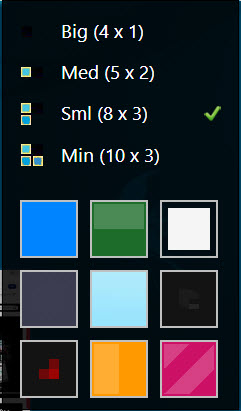
You can choose between four sizes:
Big, medium, small and mini.
Small sizes are recommended for screens with lower resolutions or with pages with lots of items.
To change a size click on the Layout icon, it will show the current size for this page. Choose another size and click Apply
Will be available soon
SkinsYou can choose between six skins.
The skins are not per page and will change the design everywhere.
To change a skin click on the Layout icon, choose a skin and click Apply
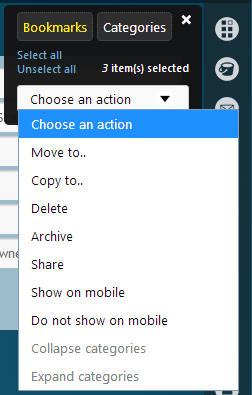
Multi Edit allows you to select multiple items or categories and perform the following actions on them:
Copy - will copy (duplicate) the selected items.
Move - will move the selected items.
Note: copy and move can be done to the same page or to another page.
Note: when Multi Edit is set to items marking the category title will mark all the items inside that category
Delete - will delete the selected items
Archive - will archive the selected items
Note: when a category with subcategories is selected, it will delete/archive also the subcategories in it.
Share - will add the selected items to the sharing box.
Assign tags - will assign the specified tags to the selected items.
Show on mobile - will make these items appear on mobile version of FavSync.
Don't show on mobile - will hide these items from mobile version of FavSync.
Note: these options can only work when Multi Edit is set to items.
Collapse categories - will collapse the selected categories.
Expand categories - will expand the selected categories.
Note: these optionss can only work when Multi Edit is set to categories.
To get familiar with FavSync in an easy way, you can follow the steps on the top right corner of the screen.
They will guide you through most of the basic steps. After finishing all the steps you should be familiar with the most important functionality on FavSync.
FavSync Add-on
PurposeBrowser add-ons add extra functionality to your browser and usually appear as an icon next to the address bar.
FavSync add-on creates a connection between the FavSync website and your browser and allows you to:
- Add items to FavSync on the go
- Import your bookmarks
- Search your items directly from the add-on, without opening FavSync website
- Add FavSync results to Google search results*
- Replace your browser new tab with FavSync new tab
- Share the currently open website
- Shows updates from your online services directly on your FavSync page*
- Autologin to any website without filling in the username and password manually*
- Unblock iFrames stored on FavSync
Add-ons are currently available on Chrome and Firefox only.
*Chrome only
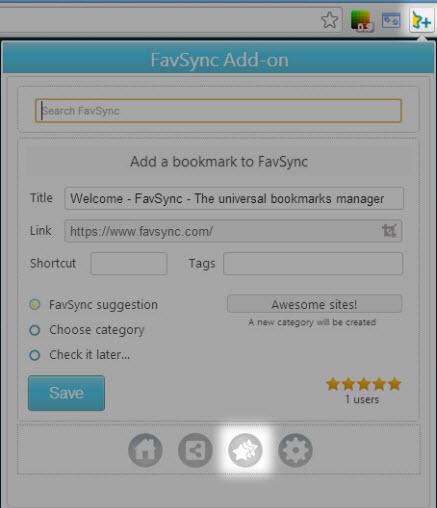
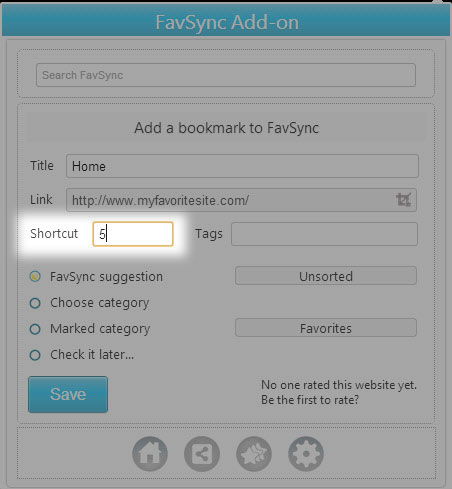
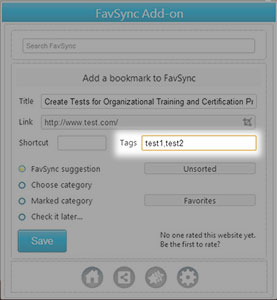
Add an item by clicking on the add-on. The add-on will automatically recognize the webpage and the type of content stored on it.
Example: when adding a webpage ending with .jpg, it will be recognized as an image and the image icon will be selected.
In most cases the webpage will be recognized as a bookmark.
You can also add notes, HTML content and images directly from the page by right clicking on them.
Read more in the sections below.
When adding an item you can change the title, trim the URL, add a shortcut, tags and set the height.
Trim URL will remove all the chars after the first "/".
Example: www.cnn.com/good-article will become www.cnn.com
Useful when you would like to bookmark the website itself, not just the page you are currently on.
Next choose where to store the item. The following options will appear:
Suggested category: If the content is recognized as a bookmark, the added bookmark will be analyzed, if successful a category where to store the bookmark will be suggested. If unsuccessful an Unsorted category will be suggested.
Click here to read more about how FavSync automatic suggestion works.
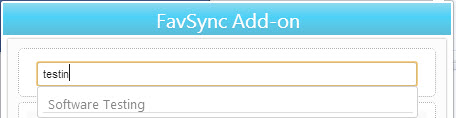
Choose category: allows you to choose a category manually where to store the item. The search field allows you to quickly search for a category. The last chosen category is automatically selected the next time you add an item.
Marked category: in case you need to store many items into the same category, you can mark a category and save items quicker into it.
To mark a category click on the control panel of a category and choose Mark category.
If no category is marked, the marked category option will not appear in the add-on.
Check it later: this option is specially for storing items you would like to check later. A category will be created in your Main page, called Check later. If the category already exists it will add into it.
You can also access your Check later items by clicking on the Check later icon in the right panel or directly through the Check later page.
To avoid duplicates you will get a notification when an item already exists.

Bookmark is the most common item type added through the add-on. Add a bookmark by simply clicking on the addon.
If a bookmark is recognized differently, for example as an image, but you would like to store it as a bookmark, just switch to the bookmark icon.
You can add a note directly from the currently open webpage.
Simply highlight the text on the page, right click on it, click on FavSync and Add note
You can edit the note before saving it.
You can also save a new note, by clicking on the add-on, choosing the note icon (in the right corner). Useful when you would like to add a note from scratch quickly.
You can add an image directly from the currently open webpage.
Simply right click on the image and click on Save image
You can save the currently open webpage as a formatted HTML item.
Simply click on the add-on button and choose the formatted HTML icon.
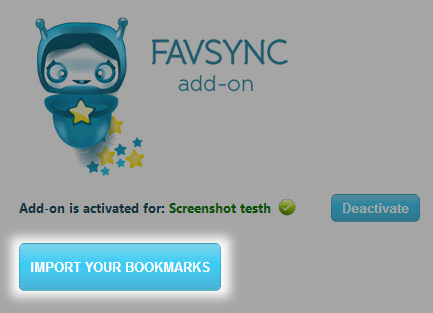
Importing bookmarks through the add-on is the easiest way to get started.
After activating the add-on click on the big Import bookmarks button (another option: by clicking on the add-on button and clicking on the import bookmarks button at the bottom menu).
In this screen you will see a tree with all your browser bookmarks. For a quick import click on Select all and Import.
If you would like to import only part of the bookmarks select the bookmarks/folders in the tree.

When importing you can choose to Keep your existing folder structure or let FavSync categorize the bookmarks for you.
Bookmarks that are not stored in any folder (in the root folder) will be categorized by FavSync anyway.
If a bookmark already exists it will not be imported.
Note that only Tree categories mode supports nested categories structures. To check which categories mode is chosen for your main bookmarks page, click on the Layout button in the right menu.
After importing is completed if there are unsorted bookmarks to categorize a notification will appear. Click on the "Start" button and follow the instructions.
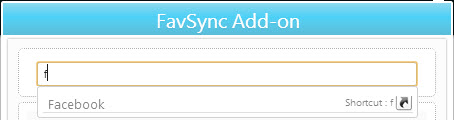
You can search for your items from the add-on, without the need to open your FavSync page. Start typing the title of the item, as you type results will appear.
You can also access your items via the one-key shortcuts and Direct Search inside the bookmarks.
FavSync add-on improves your default Chrome new tab, makes it more functional and syncs with the first page on your FavSync page.
Read more about it in the New Tab section.
As you search on Google, FavSync results appear from the right of Google results. Google results are NOT affected.
All you have to do is search on Google and the results from FavSync will appear automatically next to it.
The results are shown in case the title of the item contains all of the keywords.
Examples:
Google search: Android Games
Bookmarks that will appear: Android games, Android games free, paid Android games
Bookmark that will not appear: Android, Android apps, great games for Android
Google search: Games
Bookmarks that will appear: games, Android games free, great games
Bookmark that will not appear: only items that do not contain the word "games" in the title
By clicking SHOW MORE it will show results also if only ONE of the keyword matches.
Example:
Google search: Android Games
Bookmarks that will appear: Android apps, Android games free, great games
Bookmark that will not appear: only items that do not contain "Android" and do not contain "games" in their title
You can disable this functionality through the add-on options (no need to disable the whole add-on).

You can share the currently opened website directly from the add-on.
After clicking on the add-on, click on the Share button at the bottom menu, a sharing box will open.
Follow the Sharing Box instructions from there.
In case FavSync add-on is installed, but the add-on button does not appear, check in the Extensions list that it is not hidden or disabled.
To access Chrome extensions list paste the following into your address bar: "chrome://extensions/"
To access Firefox extensions list press CTRL+SHIFT+A on your keyboard while in Firefox.
Upcoming stuff
Copy functionality of Chrome to FirefoxCopy all the new functionality of Chrome add-on to Firefox add-on.
Safari add-onAdd-on for the Safari browser.
Sharing Box to be opened directly in the add-onNow when clicking on the share icon, it will open FavSync in a new tab with the Sharing Box opened. Instead it will open it directly in the add-on window for a more smooth sharing.
Allow to add an already existing itemCurrently when adding an item that already exists it will notify that it already exists and will not allow to add it again. A new option will appear that will allow to add the item anyway.
Accessing your items
FavSync pageThe most common way to access your items is through the website. Simply open the desired page, scroll to the item and click on it.
You can access the FavSync website from any PC, browser or device with a simple username/password login.
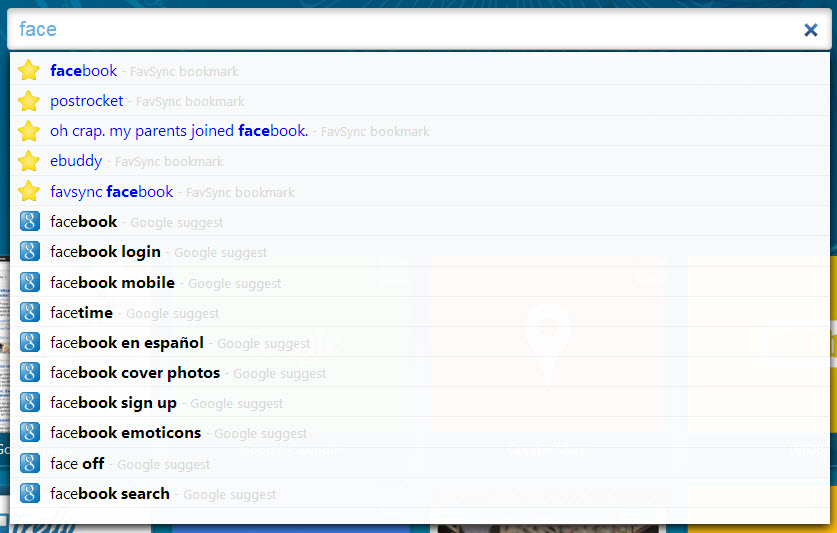
The search on the top of FavSync page searches for items, categories, tags and Google results. As you type results will be autocompleted. Pressing ENTER will perform a search on Google with the filled in keyword.
The results are shown in the following order:
Bookmarks results - with a star icon on the right. Clicking on the text of the item will open the website in a new tab, clicking on the star icon will bring you to the location of the item on your FavSync page.
Categories results - with a folder icon on the right. Pressing on the text or on the icon will bring you to the location of the category on your FavSync page.
Tags results - with a tag icon on the right. Clicking on the text of the item will open it in a new tab, clicking on the star icon will bring you to the location of the item on your FavSync page.
When there are more than three results with the same tag an option to show all items with that tag will appear. Clicking on it will show only items with that tag on your FavSync page. Click Clear filter when you are finished.
You can search for multiple tags with "and" and "or" functions. "and" will show results only if both tags match, "or" will show when any of the tags match.
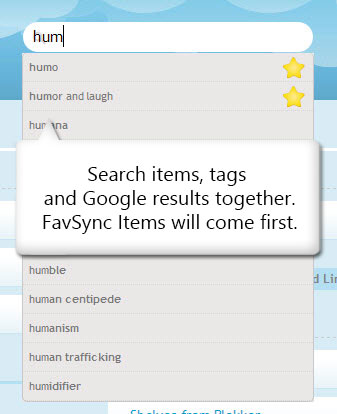
If you can't find what you're looking for easily or the searched keyword shows too many results, click on the Show results in a search page.
This will show the results in a very detailed way with previews and grouped by item type.
The search inside the add-on searches for items and shortcuts. As you type results will be autocompleted. Pressing ENTER will open the first result.
Bookmarks results - you can click on the result with a mouse or press ENTER to open the first result. Results only appear after two chars have been filled in.
Shortcuts results - shortcuts appear only if one char was filled in and that chars matches a shortcut on you FavSync page. Shortcut results are shown with a shortcut icon.
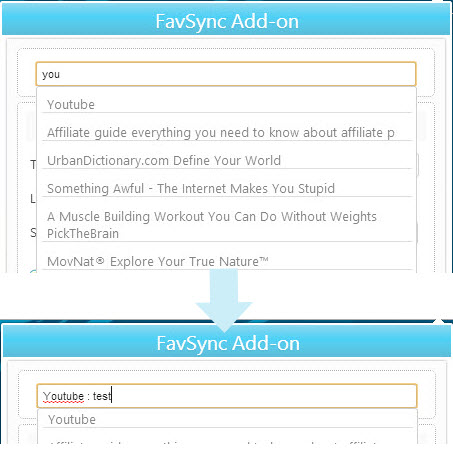
Direct Search inside results - when searching for a bookmark through the add-on, instead of opening the bookmark, press ":", the first result will be autocompleted, then fill in the search query and press ENTER.
Works also with shortcuts.
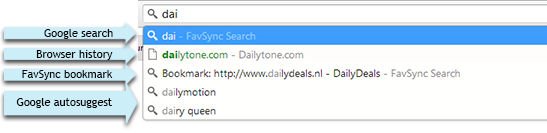
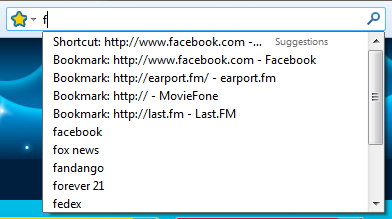
The address bar search searches for items, shortcuts, Google results and browser's history. This is the fastest and easiest way to access your items on FavSync. You can use arrow down to switch between results. Pressing ENTER will perform a search on Google with the filled in keyword.
FavSync items results start with "Bookmark:".
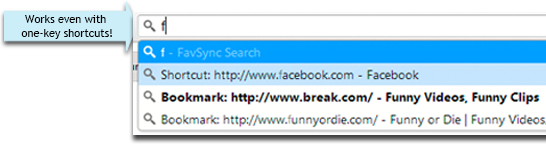
FavSync shortcuts results start with "Shortcut:". You can press ENTER already before the result appears.
Google results and results from Chrome work the same way as they are in your browser.
For FavSync results to appear, it is recommended to set FavSync as a default search engine of your browser. It will still autosuggest Google and will show the items and history from your browser. The only thing that will change is that it will add the results from FavSync to it.
Click here to learn how
You can also use it without setting it as a default search engine by typing “favsync.com” in your address bar and by pressing TAB every time.

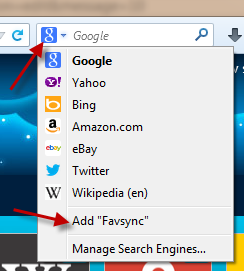
Here’s how it works in Chrome:
In the settings of Chrome click on Manage search engines.
You will see FavSync as one of the options. Click on Make default.

That's how it works in Firefox:
In the search engines field click on the icon and choose “Add FavSync”.
Then you can search on FavSync through the search engine field.
The results are the same as in Chrome, just without the browser results, which are shown directly in the address bar of Firefox, so it’s only the FavSync results + Google results.
Note two things:
1. You can always reverse it easily, by setting Google search engine as default (or any other search engine you had as default).
2. It will still autosuggest Google, will show items and bookmarks from FavSync and history from Chrome. The only thing that will change is that it will add the results from FavSync to it.
The address bar search has two settings that can be useful when setting FavSync as the default search engine:
- Open Google instead of FavSync search page when enter is pressed: when pressing ENTER it will show the results in Google, instead of on FavSync search page.
This option is useful when using FavSync as a default search engine. In that case, pressing ENTER will work the same way, as if Google is used as a default search engine.
- Show Google results: will show Google results merged with FavSync results when using FavSync search engine.
This option is useful when using FavSync as a default search engine. This way you will still see Google results, as if Google is used as a default search engine, combined with FavSync results.
You can change these settings in the Account Settings.
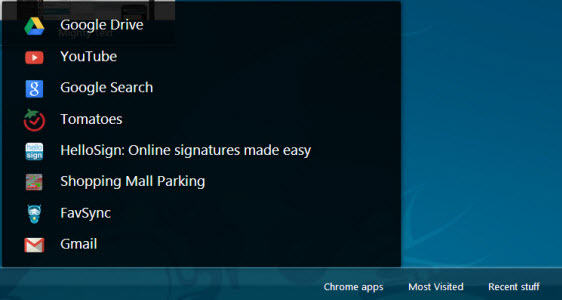
FavSync new tab replaces Chrome new tab and provides you with a more functional and more customizable new tab, that syncs with your START (or any other first page) on FavSync and allows you to access the rest of your bookmarks and items directly from your new tab.
FavSync new tab is currently only available for Chrome.
Read more about it in the New Tab section.
As you search on Google, FavSync results appear from the right of Google results. Google results are NOT affected.
All you have to do is search on Google and the results from FavSync will appear automatically next to it.
The results are shown in case the title of the item contains all of the keywords.
Examples:
Google search: Android Games
Bookmarks that will appear: Android games, Android games free, paid Android games
Bookmark that will not appear: Android, Android apps, great games for Android
Google search: Games
Bookmarks that will appear: games, Android games free, great games
Bookmark that will not appear: only items that do not contain the word "games" in the title
By clicking SHOW MORE it will show results also if only ONE of the keyword matches.
Example:
Google search: Android Games
Bookmarks that will appear: Android apps, Android games free, great games
Bookmark that will not appear: only items that do not contain "Android" and do not contain "games" in their title
You can disable this functionality through the add-on options (no need to disable the whole add-on).
Adding items
Adding items through the websiteYou can add an item directly on your FavSync page, by clicking on the Add item button. The button is located at the bottom of each category.
Currently you can choose between eight item types:
Bookmarks
Notes
HTML content
Website in a frame (iFrame)
News feeds (RSS)
Images
Video clips
Lists
Adding items through the add-on is the easiest and the fastest way to add content to your FavSync page.
You can add almost any item type through the add-on, by clicking on the add-on or by right clicking on the item at the page directly.
Read more about in the FavSync Add-on section
Importing bookmarks through the add-on is the easiest way to get started.
After activating the add-on click on the big Import bookmarks button (another option: by clicking on the add-on button and clicking on the import bookmarks button at the bottom menu).
In this screen you will see a tree with all your browser bookmarks. For a quick import click on Select all and Import.
If you would like to import only part of the bookmarks select the bookmarks/folders in the tree.
When importing you can choose to Keep your existing folder structure or let FavSync categorize the bookmarks for you.
Bookmarks that are not stored in any folder (in the root folder) will be categorized by FavSync anyway.
If a bookmark already exists it will not be imported.
Note that only Tree categories mode supports nested categories structures. To check which categories mode is chosen for your main items page, click on the Layout button in the right menu.
After importing is completed if there are unsorted bookmarks to categorize a notification will appear. Click on the "Start" button and follow the instructions.
Another way of importing your bookmarks from the browser is by importing a HTML file.
This solution can be useful for users that do not use Chrome or Firefox or do not want to install the FavSync add-on.
To learn how to export your bookmarks to a HTML file follow these guides:
Chrome
Firefox
Safari
Internet Explorer
To import a HTML file follow these steps:
- open Account Settings
- click on Choose file, choose the HTML file to upload
- choose into which page to upload.
- click Import
Note: in order to keep the folder-subfolder structure you must import the bookmarks into a page with Categories Mode: Tree.
Note: it will not delete the existing bookmarks on that page and will not import duplicate bookmarks.
To export bookmarks simply click on the Export bookmarks to HTML. It will export the bookmarks from the Main page to a browser HTML file. You can import that HTML file to any browser or back to FavSync at a later stage.


To import bookmarks from an Excel file follow these steps:
- open Account Settings
- click on Choose file and choose the Excel file to upload
- choose into which page to upload.
The excel must be in the following format:
Column A: URL;
Column B: Name;
Column C: Category;
You can also get this format if you export to Excel first.
Note: currently it is only possible to import/export bookmarks from/to excel.
Importing from another webpage allows you to extract links from another webpage and import them as bookmarks directly to your FavSync page.
Example: an article about top 100 online services. Next to each service in the article there is a link to that service. FavSync will import all the 100 links and store them as bookmarks.
Here's how it works:
Open the account settings and fill in these fields:
Import from this URL - Provide the URL from which you would like to import the links
Start from this URL and Stop at this URL - Provide the first and the last link, so that FavSync will import only what's between these two links. The starting and stopping URL are serving as a start and stop points. This is needed to avoid importing lots of unnecessary links that do not belong to the article, like links in the header and the footer of the webpage.
After clicking the preview button all the extracted links will be shown. Use the Select/Unselect fields to quickly select or unselect specific domains in the extracted links.
The extracted links will be saved as bookmarks in "Imported from another website" category.
Importing from copy/paste allows you to extract links from a chunk of text and save them as bookmarks on your page directly on your FavSync page.
Simply paste the text and FavSync will extract all the links out of it for you and save them as bookmarks in "Imported from copy/paste" category.
Note that links are recognized when they start with "http" or "https".
FavSync creates a personal email address for every user with the @addtofavsync.com domain.
Users can add items to their FavSync account by sending an email with links, notes and images to their virtual email.
Read more about in the virtual email section
Items types
Purpose
FavSync allows users to store the following items:
- Bookmarks
- Notes
- HTML content
- Website in a frame (iFrame)
- News feeds (RSS)
- Images
- Video clips
- Lists
Every item type stores a different type of content and behaves differently.
Yes.
 Bookmark
Purpose
Bookmark is the most common item on FavSync, allowing users to store a link inside of it.
Clicking on the bookmark will open the website in a new browser tab.
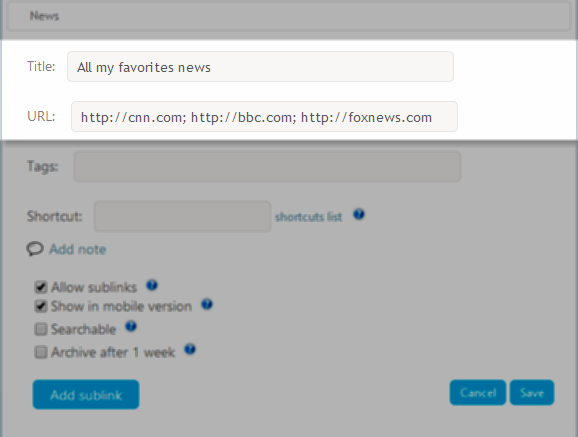
You can store multiple links in a bookmark, separated by a semicolon. Read more about it here.
There are many ways you can add bookmarks to your FavSync page.
Read more about it in the Adding items section.
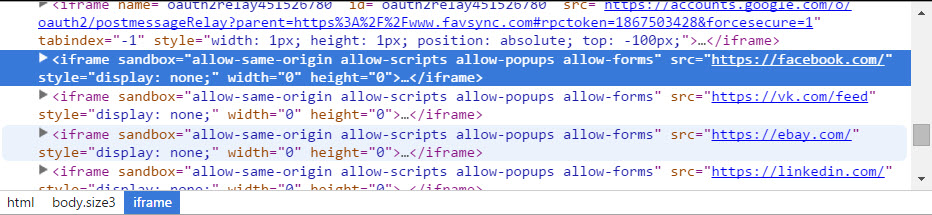
 Website in a frame (iFrame)
Purpose
iFrames allow you to show the website directly on their FavSync page, in a small frame, this way you can see the website without the need to open it.
Clicking on the title of the iFrame will open the website in a new tab.
You can add iFrames directly on the FavSync page or through the add-on.
Read more about it in the Adding items section.
Note: iFrames only work in the view mode: classic
The height field allows users to specify the height of the iFrame, the size of the frame will be based on that.
The height for iFrame cannot be lower than 5.
Some websites do not allow to be shown in an iFrame. In that case you will get a message saying that the website is blocked.
Users that have FavSync add-on installed (currently only in Chrome) will be able to see these websites anyway, because the add-on will unblock it.
Since FavSync is using a secure SSL connection (https), iFrames that are stored on a not secure connection (http) will cause your browser to issue a warning and will block the iFrame from loading.
That does not actually mean that it is dangerous (it is as safe as if you would open the website that you stored in the iFrame manually), it is just a browser precaution when trying to load http content from a https website. You can easily disable it by clicking on the shield icon at the address bar and choosing Load unsafe script
However, it is very recommended to use https whenever it is possible.
 Note
Note
Purpose
Notes allow users to store unformatted text. Clicking on the note will show the text in a modal window.
You can add notes directly on the FavSync page or through the add-on, by highlighting a text on any webpage and clicking with the right mouse button on it or by sending it to your Virtual Email.
Read more about it in the Adding items section.
The height field allows users to specify the height of the note.
If the height is 0 the note will be visible only by clicking on the title. If height is higher than 0, the note will be shown directly on the page.
Use the Auto height option if you would like the height be automatically recognized based on the amount of text stored in the note.
Note: height only works in the view mode: classic.
 HTML frame
Purpose
HTML frame allows users to store any HTML code in it, most commonly used to store formatted notes or web content from another webpage. Clicking on the HTML frame will show the content inside of it in a modal window.
You can use our built-in HTML editor to create HTML frames from scratch or copy content from another webpage and paste it directly into the editor. It should keep most of the structure and the formatting of the content.
You can add HTML frames directly on the FavSync page or through the add-on, by highlighting any content on any webpage and clicking with the right mouse button on it.
You can also save the whole webpage as a HTML frame!
Read more about it in the Adding items section.
The height field allows users to specify the height of the formatted note.
If the height is 0 the formatted note will be visible only by clicking on the note. If height is higher than 0, the formatted note will be shown directly on the page.
Note: the height only works in the view mode: classic.
 Image
Image
Purpose
Images allow users to provide a URL to an image or upload an image from the PC. Clicking on the image will show the image in a modal window.
In view mode: Icons the thumbnail of the image is shown as an icon.
The height field allows users to specify the height of the image.
If the height is 0 the image will be visible only by clicking on title. If height is higher than 0, the image will be shown directly on the page.
Use the Auto height option if you would like the height be automatically recognized based on the amount of text stored in the note.
Note: the height only works in the view mode: classic
When images are stored in the same category, you can view them as a gallery, by clicking on the arrow left and right buttons.
 Video
Video
Purpose
Videos allow users to store the item as a video playable directly from the FavSync page.
You just need to specify the link that contains the video, FavSync will extract the exact URL of the video for you.
You can add videos directly on the FavSync page or through the add-on.
Read more about it in the Adding items section.
The height field allows users to specify the height of the video.
If the height is 0 the video will be visible only by clicking on title. If height is higher than 0, the video will be shown and can be played directly on the page.
Note: the height only works in the view mode: classic
 News feed (RSS)
Purpose
News feeds allow users to keep up with the news and information that is important to them. Clicking on the RSS feed will show the feed in a modal window.
To read more about what are RSS feeds click here.
You can specify more than one RSS feed, by separating them with a semicolon. FavSync will merge them into a single news feed.
You can add news feeds directly on the FavSync page or through the add-on.
Read more about it in the Adding items section.
Users can filter only the important news for them by providing custom keywords. When custom keywords are filled in, only the news with the matching keywords will be shown.
To show all the news click on the Show all button. This setting is not saved and next time the custom keywords will be applied again.
You can provide multiple custom keywords by separating them with a semicolon.
On the right side of the title notifications the amount of unread news will be shown in the brackets.
In case custom keywords are provided the unread notification will refer only to the matching keywords news and will be highlighted in green, to specify that there are unread and very relevant news for the user.
If no custom keywords are provided the unread notification will not be highlighted and will refer to all the unread news.
Clicking clear, clicking on the title of the RSS feed or clicking on one of the news in the RSS feed will clear the notification.
Update interval setting sets how often the RSS feed will be refreshed.
That is only valid if FavSync page was not refreshed manually. If FavSync was refreshed the RSS feed will be updated also.
Even though the update interval setting is separate in every RSS feed, once changed in one feed, it will affect all the others also. In other words, update intervals will be same in all the RSS feeds.
The height field allows users to specify the height of the RSS feed.
If the height is 0 the RSS feed will be visible only by clicking on title. If height is higher than 0, the RSS feed will be shown directly on the page.
Note: the height only works in the view mode: classic
 List
List
Purpose
Lists allow users to create checklists with entries that can be ticked or just lists to store information in a more structured way.
It is mainly useful for tasks lists, shopping lists or any other for entries that can be accomplished.
You can add lists directly on the FavSync.
Read more about it in the Adding items section.
Due date is an optional field, allowing users to specify when the tasks have to be completed.
If the due date has passed, it will be shown in red.
The height field allows users to specify the height of the list.
If the height is 0 the list will be visible only by clicking on title. If height is higher than 0, the list will be shown directly on the page and entries can be checked, dragged, added, edited and removed directly on the FavSync page also.
Note: the height only works in the view mode: classic
Stay Updated service
PurposeThe Stay Updated service allows you to see an overview of all the updates, notifications and messages from the websites you use in one shot, directly on the FavSync page, saving you the hassle of checking them one by one.
How to activate itWhen adding/editing an item that is a bookmark, fill in the URL of the website and click on the Turn on Stay Updated button.
Whenever there is an unread notification on that website, it will be shown next to the title with the amount of unread notifications.
Example: Facebook (3) means Facebook has 3 unread notifications.
Currently the service is available to a limited amount of websites, however we are working on supporting more and more websites. You can see the list of supported websites in the Stay Updated overview.
You can see an overview of all the updates in one shot by clicking on the Stay Updated button in the right bar.
The list will show all the websites that have the Stay Updated enabled from all the pages.
Currently Stay Updated works only in Chrome when the FavSync addon is installed. Firefox integration will be soon.
Don't run on startupWhen this checkbox is checked, Stay Updated Service will run only when you click on the refresh button next to the bookmark itself.
This can be useful when Stay Updated is on for many websites and causes your FavSync page to load slower because of that.
No, it has absolutely no effect on the notifications themselves. You will still need to open the website and open the notifications for them to become read.
How does it work?FavSync addon is loading the websites in the background and checks if there are notifications on your user.
You do not need the website to be open, but you must be logged in on these websites for the Stay Upadted service to work,
You can also see your unread notifications directly on the Chrome New Tab.
Just click on the bell icon and wait for the notifications to load.
Please note that, Stay Update will not check for unread notifications if the bell icon is not clicked (That works different from the way it works on the FavSync website itself).
There are couple of reasons why you might not see notifications:
1. Your add-on is not installed or disabled or you are not using Chrome
2. You are not logged in to the website at this moment
3. The website is not loaded in the background
4. The link to the website is not configured properly.
Here is a quick troubleshooting you can do yourself:
1. If FavSync add-on button does not appear at the top right corner but is installed, please open the extensions list in Chrome and make sure the add-on is enabled.
2. Please open the website and check that you are logged in.
3. This step requires a bit of technical knowledge:
Press F12 on the keyboard or right click anywhere on the FavSync page and click Inspect Element.
You should see an entry for the website in the HTML code. It should be at the bottom and should look like this:
If the entry does not appear that means the website is not loaded in the background.
Please try to refresh the FavSync page, if that does not help you can try to disable and enable the FavSync add-on through the extensions list. If that still does not help, please report the issue to us.
4. If the problem is not any of the issues above, In this case the issue is probably in our configuration link with this specific website.
Please inform us about this issue.
Automatic suggestion
PurposeWe believe that keeping bookmarks lists short and categorized is the key to finding the bookmark you need quickly.
Unfortunately most of the time we add a bookmark we simply forget to choose the right category for it. FavSync is analyzing every added bookmark and suggests where to store it, saving you the hassle to do it yourself.
In order to successfully suggest where to store the bookmark, FavSync needs to analyze the added bookmark and match it with the existing users' categories.
Analyzing the bookmarks is done through complicated algorithms. In some cases there will be no suggestion or the suggestion might be wrong, mainly because some bookmarks do not provide enough information or some websites are simply too general or too vague. We are doing our best to make the suggestions more and more accurate.
Recognizing users' categories is based on the bookmarks which are already inside of it or on the category name. By moving the mouse over the category the text recognized by will appear. This shows how FavSync recognized the category. In case it is not accurate you can recognize it manually, by simply clicking on the recognized by.
Please note that automatic suggestion is only there to assist you and in no way obligatory.
FavSync will automatically suggest where to store the bookmark, when a bookmark is added via the add-on. There are four possible results:
1. If FavSync analyzed the bookmark successfully and a matching category already exists on users' FavSync page, it will suggest that category.
Example:
Boomkark: www.cnn.com
It is recognized successfully as a news bookmark and the user already has a recognized category as news. This category will be suggested.
2. If FavSync analyzed the bookmark successfully and a matching category does not exist on users' FavSync page, it will suggest to create a new category.
Example:
Bookmark: www.cnn.com
It is recognized successfully as a news bookmark. The user does not have a category recognized as news category. Creating a new category, which will be called "News" will be suggested and the bookmark will be stored inside of it.
3. If the added bookmark is not a primary domain and the user already has a bookmark with the same domain and that bookmark is a primary domain.
Example:
Bookmark: www.cnn.com/niceArticle
The user already has a bookmark of cnn.com. The added bookmark will be suggested to be stored as a Sublink of cnn.com.
Read more about Sublinks here.
4. If FavSync did not analyze the bookmark successfully an Unsorted category will be suggested. Unsorted is a category that stores all the bookmarks that were unsuccessfully analyzed.
Shared category
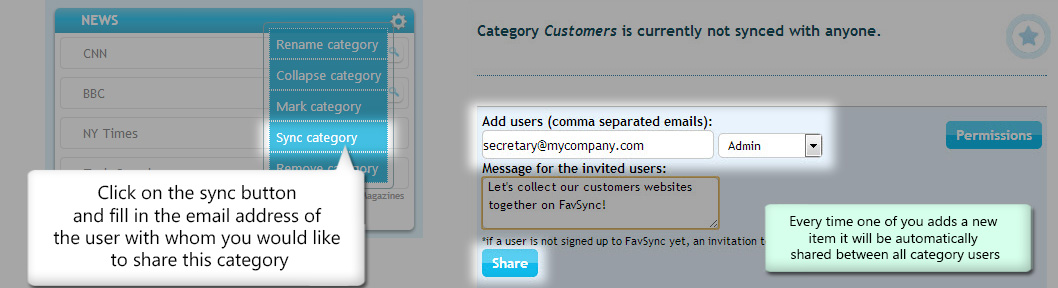
PurposeShared category allows you to share a category of items with other FavSync users. Any change in the category is automatically updated for all the users. You can share a category with an unlimited amount of users, assign different permissions and leave remarks on every item.
When is it usefulHere are some great examples of how you could use a Shared category:
Useful content for the whole organization - create a category, store all the content your organization needs and share it with all the colleagues. Any time someone finds a new useful content for the organization they can add it and it will appear for everyone.
Whenever there is a new colleague, simply share the category with them.
Working on a project - while working on a project together you often need to collect useful content for that project.
Buying things for home - you and your partner are looking for new stuff for home.
Working on a trip - you and your friends are planning a trip together and need a collaborative way to gather all the useful content for that trip.
Stuff to download - collect stuff with friends that you know they might want to download.
These are just some examples of how you could benefit from a Shared category.
Mouse over any category => click on the control panel => choose Share category => fill in the e-mail address of the recipient => optionally fill in a remark and choose a permission => click Share
If the invited user has not signed up on FavSync yet, an e-mail invitation will be sent to the specified e-mail address with a sign up link. After the invited user has signed up the shared category will already appear.
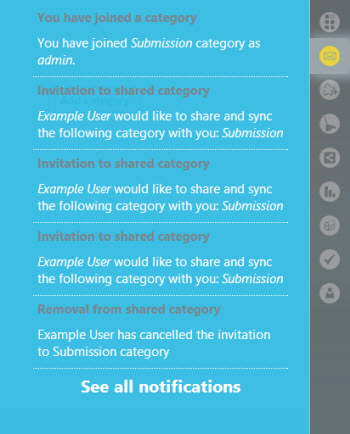
When the invitation will be accepted you will get a notification and "(SHARED)" will be added at the end of the category title, then you can start collecting content together.
You will get a notification when one of the following events occur:
- an item was added, edited or deleted in the shared category
- someone joined or quit the shared category
- someone renamed the shared category
- ownership transferred
Whenever there is a notification the icon will become yellow.
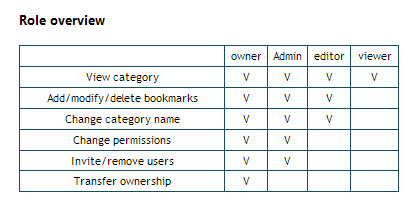
When sharing a category you can choose between three permissions for the invited user. Please see permissions table below:
To quit a shared category when you are an invited user (not the owner), simply delete it same way as a regular category.
There are two options when quitting a shared category when you are the owner:
1. Transfer ownership - choose one of the users in the shared category to become the owner instead of you. This way the category is not deleted for all the users.
2. Unshare the category - makes the category regular and removes it from everyone's FavSync page. The users cannot retrieve the items that were stored in the category.
FavSync new tab
PurposeFavSync new tab replaces Chrome or Firefox new tab and provides you with a more functional and more customizable new tab, that shows content from your START (or any other first page) on FavSync and allows you to access the rest of your items directly from your new tab.
FavSync new tab is currently only available for Chrome and Firefox.
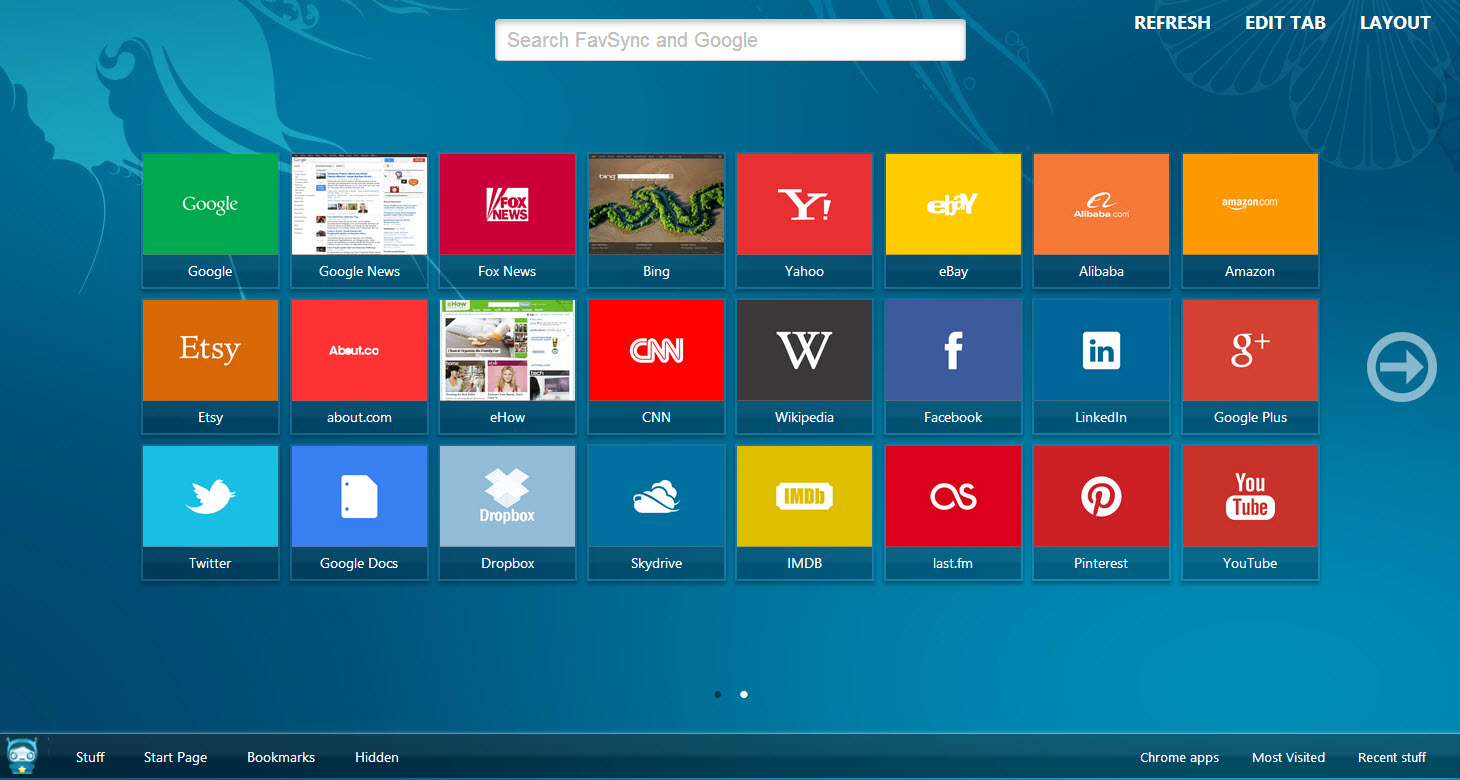
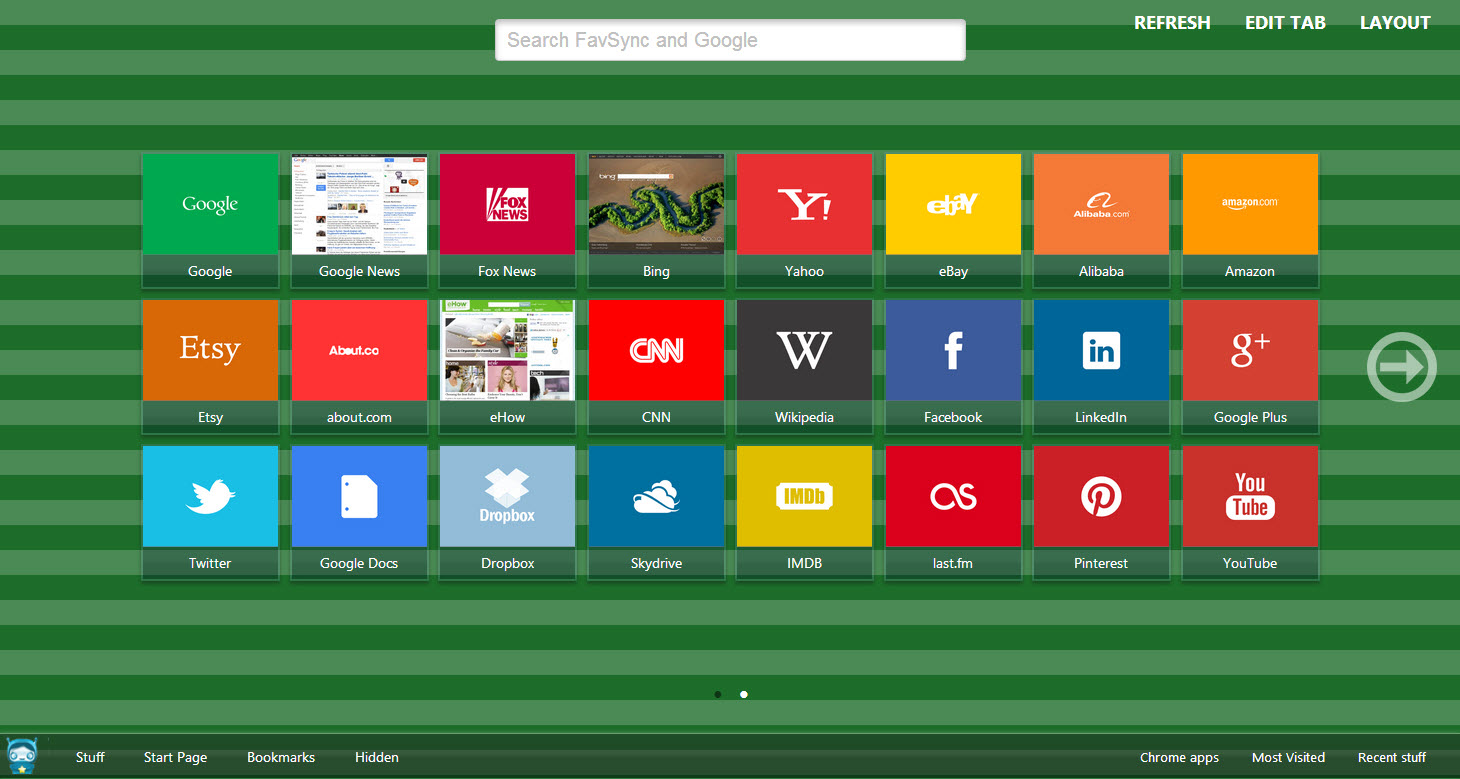
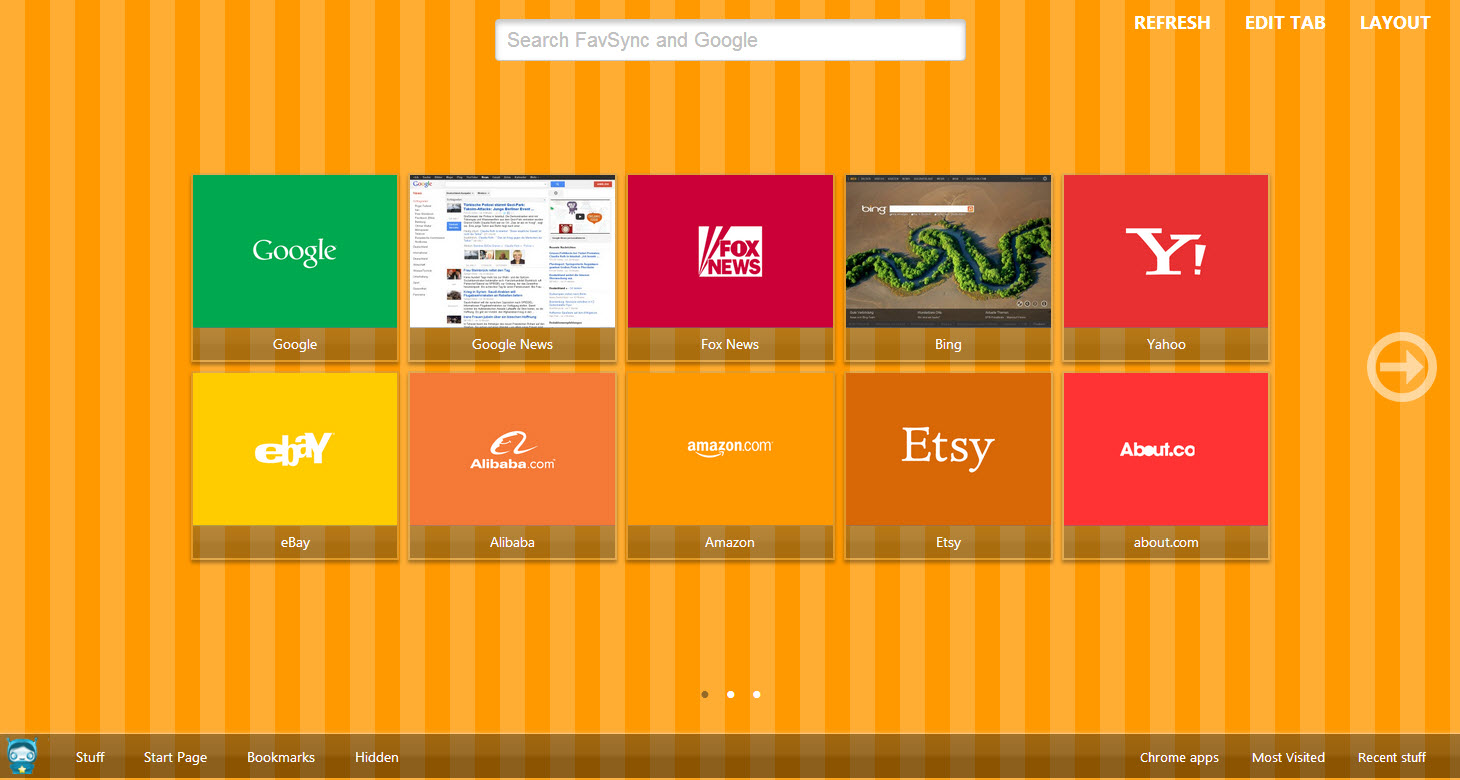
After activating the FavSync add-on, your new tab will be automatically replaced by FavSync new tab with the bookmarks and other items stored on your first page (usually named START).
The new tab is only viewable, to do any changes you have to do them on the first page of your FavSync page. You can click EDIT TAB on the top right corner that will bring you directly to your START page.
Whenever a change is made click on the REFRESH button. The new tab refreshes by itself every minute when it is open.
By clicking the Layout button you can choose between nine skins and four sizes. The numbers indicate how many items can fit in one row and how many rows will be on one new tab.
If the items don't fit in one page, another page will be automatically created.
The search bar allows you to search your items on FavSync, tags and Google at the same time.
At the left button corner you will find the list of pages from your FavSync page, clicking on one of the pages will show the categories of that page, clicking on a category will show the items of that category.
Categories and items are sorted alphabetically.
When you mouse over an item a star icon will appear, clicking on it will allow you to copy or move the selected item to your New Tab.
You will need to click on the New Tab Refresh button (not the browser refresh button) for the item to appear on your New Tab.
At the top of the list you can open the selected page on FavSync or filter the categories of that page and the items in the selected category.
At the right bottom corner there are three buttons:
- Chrome apps - shows the Chrome apps you have installed
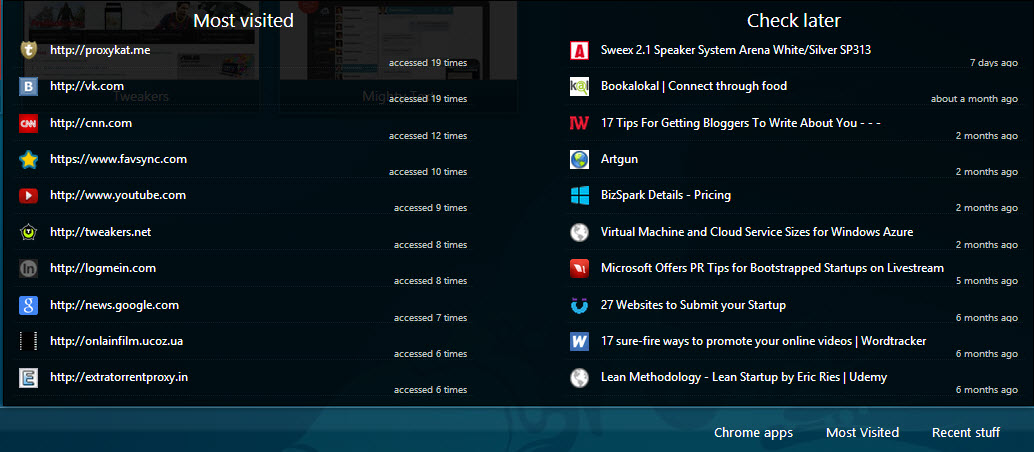
- Most visited - shows the most visited items on FavSync and the items in Check Later category
- Recently closed - shows the recently closed tabs of your browser (not FavSync) and the recently added items on FavSync
When adding an item through the add-on, choose the first page in the list and save it there.

We believe that the new tab should be simple, therefore, at this moment it does not support categorization. Your START page (or any other first page) can be categorized on the FavSync website, but it will show it as a list of items on the new tab.
FavSync mobile
Mobile website
Mobile optimizationWhen accessing FavSync website from your mobile phone, the website will be automatically optimized to fit your mobile screen.
Most of the functionality of FavSync is also available on your mobile.
Please note the following differences:
- It is currently not possible to drag items and categories. You can move items and categories through the Multi-Edit button instead.
- To edit and remove items and categories use the Multi-Edit button at the bottom bar.
- Categories in Categories mode Columns are shown as a list of categories instead.
Show on Mobile allows you to specify which items will be shown on the mobile version of FavSync.
Since many websites have mobile apps, you can simply hide them from your mobile version of FavSync.
The Show on mobile checkbox can be found in the add/edit item form or in the Multi-Edit.
To see all the items (also the one's checked not to be shown on mobile) tap on the computer icon at the bottom bar, on your mobile.
Android/iOS mobile app
Purpose
FavSync mobile app allows users to instantly access their content on FavSync. Since the app synchronizes most of the content and stores it inside the mobile device, you do not need to wait for the content to load.
This way you can access content stored on FavSync even faster than through the mobile website.
You can download the FavSync mobile app for Android from here
You can download the FavSync mobile app for iOS from here
Content stored on your FavSync account online and content stored on your mobile app will be automatically synchronized, whenever you open the mobile app.
Note that FavSync does not synchronize the content itself.
What is being synchronized and can be accessed offline:
- Pages
- Categories
- Bookmarks
- TItles of all the other items: notes, HTML content, images, videos, lists, iFrames and news feeds.
What is NOT being synchronized and cannot be accessed offline:
- Content stored inside notes, HTML notes, images, videos, lists and news feeds.
When the app is opened for the first time, it will initiate a full synchronization and will downloaded and store inside the app the things mentioned above.
Afterwards, every time the app is opened or any category is being opened, it will check for changes and will synchronize if needed.
You can also synchronize manually by pulling up the screen all the way.
After opening the mobile app, you will get to the first page of your FavSync account (usually the START page), from where you can access your most visited websites or your most used content very quickly.
In the latest versions we also added the Recently added items and items from the Check later category. This way you can easily access all the things you need directly when you open the app.
To check the rest of the pages of your FavSync account tap on the Pages button.
Afterwards, title of categories stored inside the page will be shown.
After tapping on a category, you can see the items inside of it.
Currently all the pages have the same presentation, regardless to the view settings chosen for that page.
When tapping on a bookmark your default browser will be opened with that website.
When tapping on any other item, it will be opened inside the app (in a webview).
Tapping on the filter button will show a list of items. You can choose which one's you would like to see.
In case you would like to see ONLY a specific item type, tap on ALL to uncheck all and then tap on the item type you would like to see.
Example: in a category full of items, you would like to see only images. In that case tap on Filter => All => Image => Apply
To quickly search for an item, click on the search icon and type in the title of the item.
You can easily filter out item types.
Note: by default only one type of item is selected, so the search performed not on all types of items.
To see a specific item type from ALL the pages and categories, just tap on an item type without typing anything.
Example: you would like to see all the notes stored on your FavSync account. Tap on search => tap on note.
To edit or remove an item, tap and hold on an item and choose edit or remove.
To add an item click on the + button at the bottom of the page.
Users can add bookmarks to FavSync on the go through the Share button.
In any browser tap on Android menu button, tap on Share and choose Add item.
You can specify the title and choose where you would like to store the bookmark between the following options:
- Check it later - will quickly store the bookmark in the Check later category. If the category doesn't exist it will be created on your main page.
- Marked category - the bookmark will be stored in a marked category. Marked category is useful when you need to store many bookmarks in the same category.
- Choose category - allows you to specify in which category to store the bookmark.
- Create category - create a new category and store the bookmark there.
You need to login once to FavSync to use the Share button.
Through the menu button users can get to the following menus:
- Account settings
- Password manager
- Check later
- Knowledge base
- Feedback
- Bug report
- Log out
Android widget
PurposeFavSync Android Widget allows you to select items from your FavSync pages and access them quickly from your launcher page, without opening the FavSync app first.
How does it workAfter adding the widget you will be able to choose the items you would like to show.
Chosen items will be added to the top part.
If you chose more than 4 items, the widget will become scrollable. You can also can resize the widget.
It is currently not possible to edit the widget, after it was added. In case you need to add/remove items to the widget please re-create it.
Android Recently added items widget
PurposeFavSync Android Widget allows you to access the recently added items to your FavSync page directly from your launcher page. This way you can add an item to your FavSync page and open it on the mobile easily.
The widget will refresh itself occasionally.
After adding the widget, the widget will refresh itself occasionally or you can refresh it manually, by taping on the refresh button.
The widget shows the last 10 added items. The widget is scrollable. You can also can resize the widget.
Direct Search
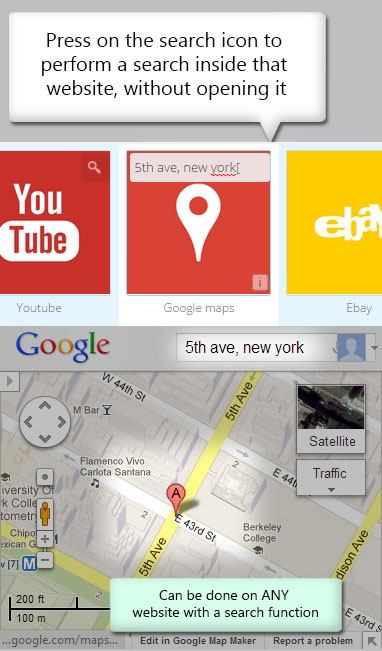
PurposeDirect Search allows you to search inside the bookmark without opening it first. The website will be opened with the result in it.
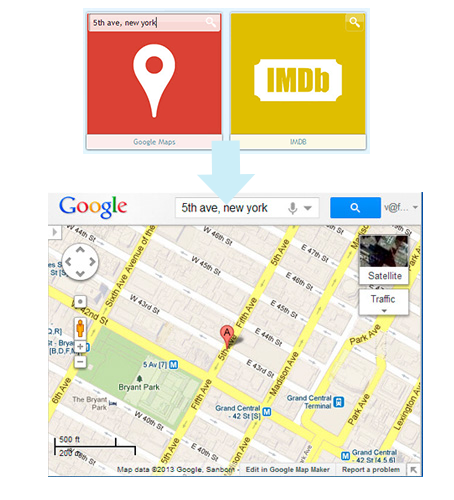
Click on the search icon on the right corner of the bookmark, fill in the search and press ENTER.
When searching for a bookmark through the add-on, instead of opening the bookmark, press ":", the first result will be autocompleted, then fill in the search query and press ENTER.
You can also combine Direct Search with one-key shortcuts. Simply type in the shortcut and the result will appear, press ":" instead of opening it and follow the rest. Read more about shortcuts here.
Start typing the website you would like to search inside, press arrow down to have it selected and add “:” and then your search query.
It can be also combined with shortcuts.

Click on the search icon on the right corner of the bookmark, fill in the search and press ENTER.
Making a bookmark searchableClick on the Edit item and check the Searchable checkbox.
Follow the instructions on the website how to get a search query.
Note that you can only search inside bookmarks that are marked as searchable.
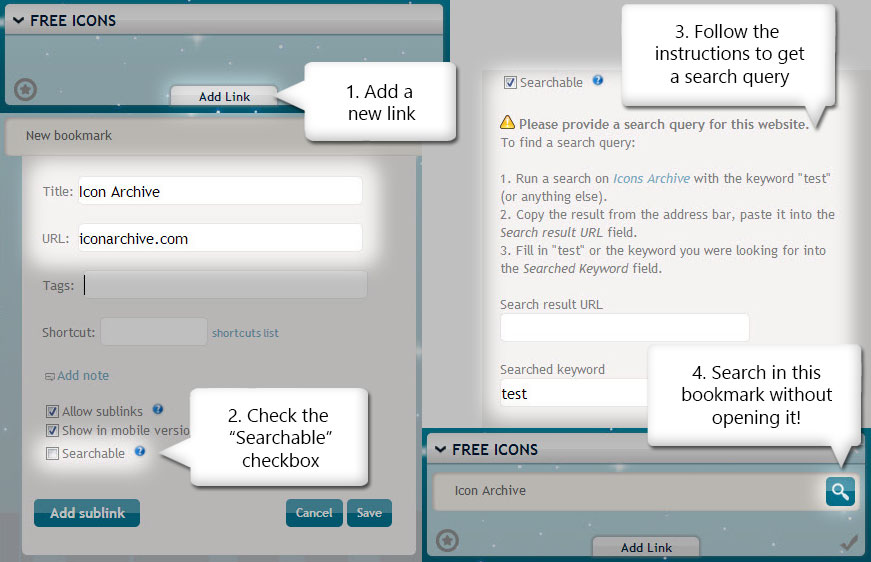
Click on the Edit item and uncheck the Searchable checkbox.
Upcoming stuff
Direct Search in all the bookmarks in a categoryA search field in the header of the category that will perform a Google search in all the bookmarks in the category at once.
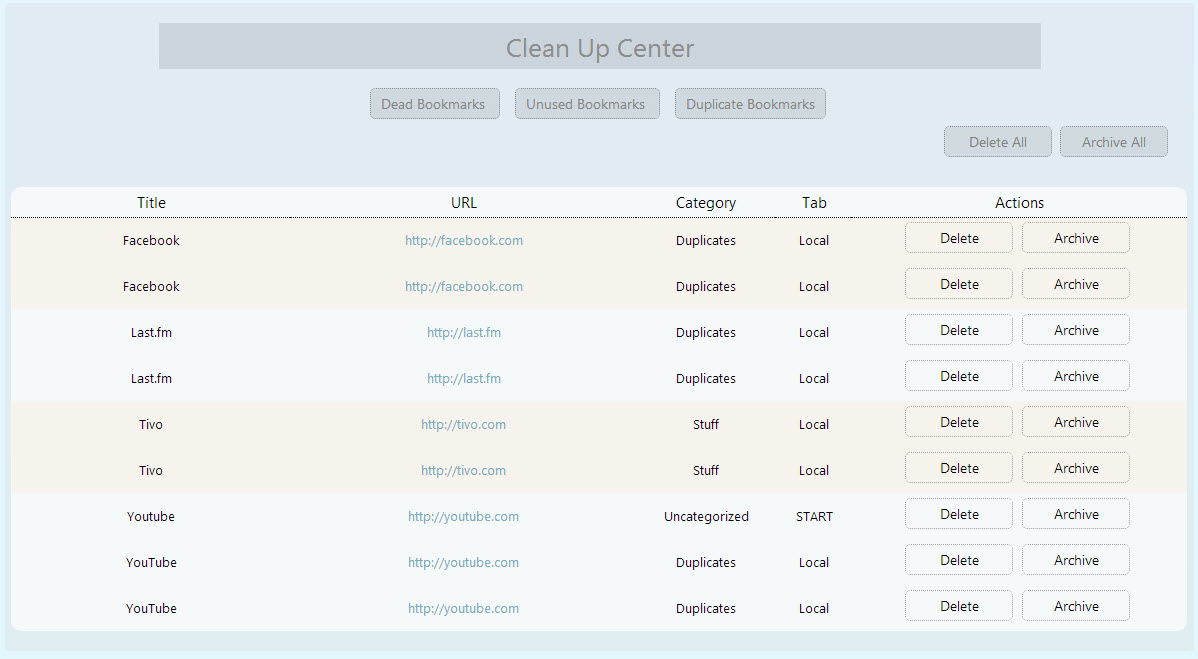
Clean Up Center
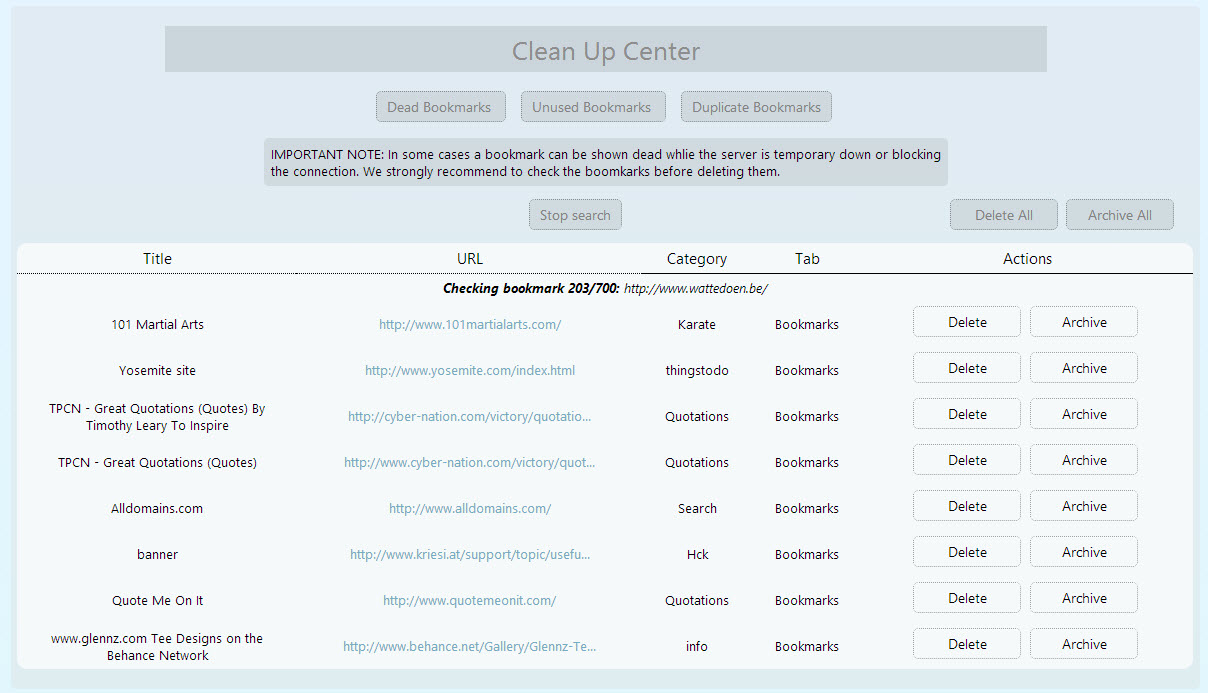
PurposeClean Up Center helps you keep your items lists short and clean. You can quickly find unused items and dead and duplicate items.
Lists bookmarks that lead to not existing websites.
Note that some websites might be temporarily down or respond with a wrong status. Please check the bookmarks before deleting them.
You can delete and archive the bookmarks one by one or all at once.
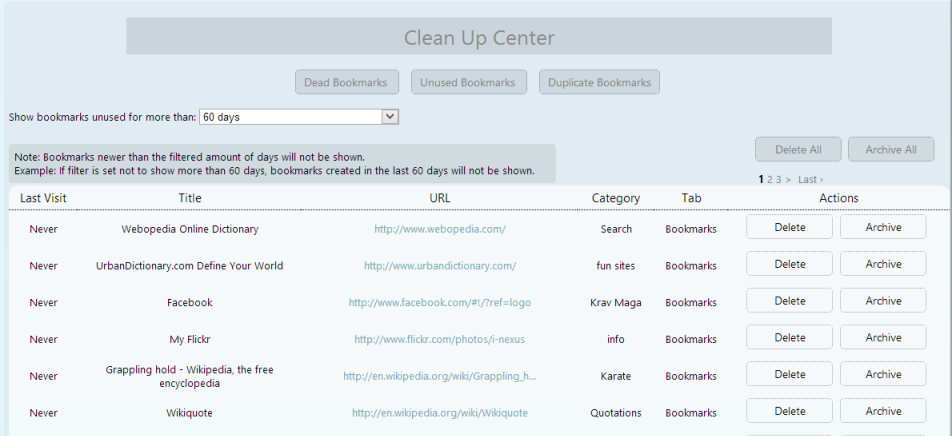
Lists items that were not accessed in the specified period.
You can choose the period yourself.
You can delete and archive the items one by one or all at once.
Lists bookmarks that have the same URL.
You can delete and archive the duplicate bookmarks one by one or all at once. When deleting all at once it will only delete the duplicates.
You can archive items and categories, instead of deleting them completely. Archiving is another way to keep your items lists short and clean.
Read more in the Archive Page section.
Archive Page
PurposeYou can archive items and categories, instead of deleting them completely. Archiving is another way to keep your items lists short and clean.
When deleting an item or a category choose Archive it.
The item will be moved to Archive Page, instead of being completely deleted. Then you can retrieve the item back anytime.

After archiving for the first time, the Archive Page will appear as the last page. You can optionally hide it through the layout form.

Inside the page, the functionality and the UI works same way as on a regular page. To retrieve an item, simply drag it to the page where you would like to store it.
Keyboard shortcuts
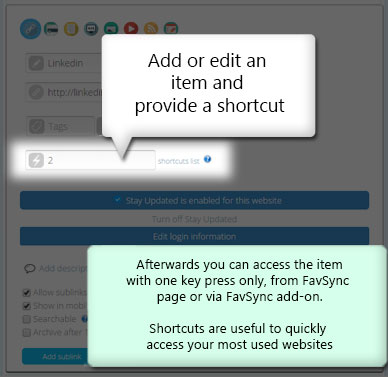
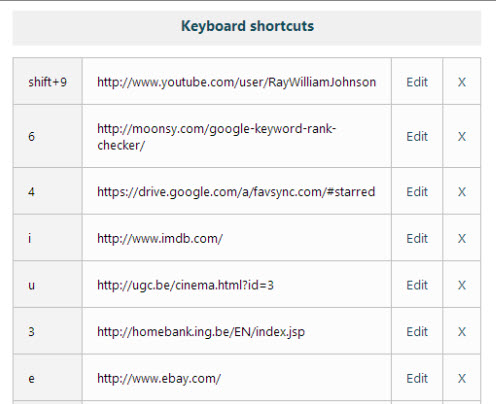
PurposeKeyboard shortcuts allow you to "speedial" the items on your page, by using just one or two keyboard-keys combination.
You can speedial your items from your FavSync page, FavSync add-on and browser address bar.
Shortcuts are very useful for your most used bookmarks.
To add a keyboard shortcut to an item follow these instructions:
mouse over the item => a control panel will appear => click Edit item and set a shortcut in the Shortcut field.
The shortcut can be a combination of two keyboard keys or one keyboard key only.
If the shortcut is already assigned to another item a notification will appear.
To add a keyboard shortcut while adding an item via the FavSync add-on follow these instructions:
click on the add-on button => the currently opened website will appear in the form => set a shortcut in the Shortcut field => save the item => the saved item is saved with a shortcut
The shortcut can be a combination of two keyboard keys or one keyboard key only.
If the shortcut is already assigned to another item a notification will appear.
You can also add shortcuts to your most visited items directly in the usage stats screen.
Simply click on Add shortcut and assign a shortcut.
The shortcut can be a combination of two keyboard keys or one keyboard key only.
If the shortcut is already assigned to another item a notification will appear.

On any FavSync page simply press on the key combination. You don't have to be on the page where the item is stored for it to work.
You can also access the shortcuts directly from FavSync add-on (click here to read more) or even from your address bar (click here to read more)!
To see a quick overview of your already assigned shortcuts, edit an item and click on Shortcuts list.
In the list you can also edit and delete existing items.
Sharing Box
PurposeSharing Box allows you to share your bookmarks easily, get notified when they were opened and keep a history of all your shares in one place.
Sharing box is currently available only for bookmarks.

The Sharing Box will appear at the bottom whenever you are dragging a bookmark or clicking on the Sharing Box icon on the right panel. Drop the bookmark into the "DROP HERE", then choose how you would like to share it.
A new entry will be stored in the Recently shared and Full log.
When the shared bookmark was opened you will get a notification and it will be marked as watched.

You can share a bookmark through the following the methods:
Social networks: Facebook, Twitter, LinkedIn, Google+
Copy button: a copy button appears next to the bookmark, when copied it will automatically create an entry in the log.
Default e-mail client: redirects you to your default e-mail client
FavSync e-mail: opens an e-mail form directly on FavSync. The recipient will see the e-mail address of your FavSync account as the sender's e-mail.
Create group: allows you to create a fixed group of recipients. Useful when sharing with a constant group of people.

Recently shared shows only the three last shares, while the full log shows all the shares.
When sharing a bookmark via a social network, copy button or default e-mail client the recipient is unknown, the edit button allows you to set a name for the recipient manually, this way you can identify easily with whom you shared this bookmark.
The delete button will delete this entry from the log only (it will not unshare it).
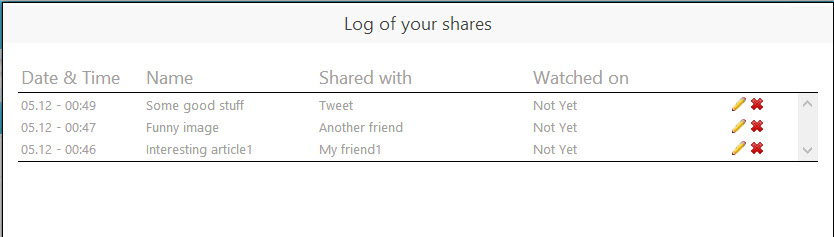
When the bookmark was opened by the recipient a notification will appear on your FavSync page and an icon will be added to your log. You can see the time when it was watched in the full log.
It is possible to share without getting notified if the bookmark was opened. Simply change from Traced to Original.

It is possible to share the currently opened website, without it being saved on your FavSync page.
Click here for instructions
Yes, there is no limit in the amount of bookmarks you can share in one time.
Just keep on dragging the bookmarks into the sharing box.
Virtual email
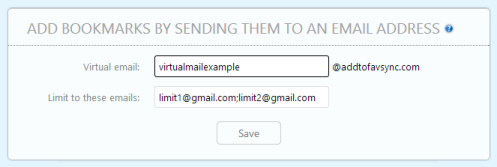
PurposeFavSync creates a personal email address for every user with the @addtofavsync.com domain.
Users can add items to their FavSync account by sending an email with links to their virtual email.
Note: This is the only purpose of this email address and it cannot be used to receive emails.
Here are some great examples of how you could use the Virtual email:
Add bookmarks from a mobile device - while browsing the web on your mobile phone or on a tablet you often need to save a bookmark to your FavSync account.
Websites to check later - during the day we often discover new websites that we would like to check later. Simply send an email to your virtual email from any device not to forget it
.
Friends and colleagues - ask your friends and colleagues to send new interesting websites directly to your virtual email, instead of your regular email.
When a new user is signed up, FavSync will automatically assign a virtual email to them, based on the first name and family name and 4 random digits. You can find your virtual email in the account settings.
You can choose your own virtual email address., it has to be minimum 8 characters, without symbols and spaces.
When email is sent to your virtual email, FavSync will extract the links out of it and save them as bookmarks in the From virtual email category.
An automatic reply will be sent with the bookmarks added to the email address specified in the FavSync account and to the email address of the sender.
For FavSync to extract the links from your email, every link has to start with http or https. The rest of the content, including the subject, will be ignored.
Limit to certain email addressesYou can limit the senders from whom your virtual email will accept emails. If the sender is different the email will bounce.
If the virtual email is not limited to any email addresses, anyone that knows your virtual email will be able to add items to your FavSync account.
To activate it, simply fill in the email address in the Limit to emails field. You can provide multiple emails, separated by semicolon.
Users can add notes via the virtual email also.
To do that simply specify "Note" in the subject and everything that is in the body will be stored inside the note.
The title will be created based on the first five words of the note.
Users can also add images, videos or news feeds directly by sending them to the virtual email.
There are no extra actions required. The item type of the URL will be automatically recognized as the right item type. If it's not recognized, it will be added as a bookmark.
Users can send an email with "Google" in the subject and what they would like to search in the body of the email. FavSync will automatically create a Google search out of it and will save it on FavSync as a bookmark.
This can be useful when you are on the go and you see something that you would like to Google later.
Here’s how it works:
1. Create a new email addressed to your virtual email and fill in Google in the subject.
2. In the body fill in what would you like to search and hit Send.


Users can specify a category where to store the added items, by adding "category:ExampleCategory" in the body of the email.
The name must match exactly, otherwise if the category does not exist a new category with that name will be created.
If a category is not specified, the item will be stored in the default From virtual email category.
Upcoming stuff
Add an imageUsers will be able to add an image, by sending an image as an attachment.
Tags
PurposeTags provide you with an additional way to categorize your items. However, tags work differently from pages and categories and allow you to set an unlimited amount of tags per item.
Adding tags from the FavSync pageTo add a tag to an item follow these instructions:
mouse over the item => a control panel will appear => click Edit item and click on the Tags field. At the bottom already existing tags will appear.
You can either click on these tags or create new one's. Simply start typing a tag, if you already have a tag matching the text you are typing, it will be automatically suggested.
If you want to choose the suggested tag you can use the arrow down key and press ENTER.
If you don't choose any tag from the list and just press ENTER a new tag will be created with the text that is already filled in.
You can put one or more tags per item.
To add tags while adding an item via the FavSync add-on follow these instructions:
click on the add-on button => fill in the tags in the Tags field. To add multiple tags, you can separate them by comma => save the item => the saved item will be saved with tags.
You can add tags to multiple items through the Multi-selection button.
Click on the Multi-selection button => check the items you want to tag => choose Assign tags => Fill in the tags. This works the same way as when assigning a tag to one item.
When you click on the top search you will see a tags cloud
The tags cloud will show the five most used tags. Clicking on the tags will filter the current page and will show only items with the chosen tag. You can change to other pages, the tag selection will stay.
Hold SHIFT to select multiple tags.
You can also search for tagged items through the top search.
Click here to read more about it.
Misc
SubcategoriesSubcategory is a category inside another category. Subcategories are only possible in Categories mode: Tree.
To create a subcategory first create a regular category, then drag it on top of the right side of another category (into the dropbox). When the category is highlighted that shows that the dragged category will be dropped inside the highlighted category. When it's not highlighted the dragged category will be dropped between the categories.
Notes:
You can collapse and expand branches of categories by clicking on the category control panel and then Collapse or Expand
If a category is deleted, it will delete all the subcategories inside of it.
When moving a category to another page, which is not Categories mode: Tree, it will move the subcategories also and position them next to each other.
Sublinks allow you to store an item inside another item. It is best used when for bookmarks from the same domain.
Example:
Primary bookmark: www.youtube.com
Sublink1: www.youtube.com/clip1
Sublink2: www.youtube.com/clip2
Sublink3: www.youtube.com/clip3
This way you can easily group bookmarks of the same domain together. Sublinks can be collapsed and expanded by clicking on the + symbol on the left side.
To add a sublink simply drag an item into the Drop sublink here dropbox or edit an item and click on Add Sublink.
When adding a bookmark via the add-on, it will automatically suggest to store it under another bookmark from the same domain, if the other bookmark's domain is a primary domain.
Example:
There is the following bookmark on your FavSync page: www.youtube.com
Adding a bookmark via the add-on: www.youtube.com/clip1
The suggestion will be to store it as a sublink of www.youtube.com
You can disable the sublink functionality for a specific item by editing the item and unselecting Allow Sublinks.
Notes:
If an item is deleted, it will delete all the sublinks inside of it.
When moving an item to another page, it will move all the sublinks inside of it also.
You can store multiple links inside one bookmark.
The links have to be separated with a semicolon.
Example: cnn.com; bbc.com; foxnews.com
When the bookmark is clicked it will open all the stored URLs in separate browser tabs.
IMPORTANT NOTE: you have to disable your browser pop-up blocker for favsync.com.
Instead of deleting a category or a page, it is possible to clear it instead.
Clearing a category will delete all the items inside of it, it will not delete the subcategories.
Clearing a page will delete all the categories, subcategories and the items inside of it.
The clear options can be found when deleting a category or deleting a page.
Users can upload a custom image for a bookmark that will replace the automatically generated thumbnail of that bookmark.
The edit thumb option can be found in the add/edit bookmark form.
Afterwards upload or simply drag the image into the window, crop out the part you want to show (400x300) and click on Create Thumbnail.
The custom image will now be shown.
To remove the custom image open the Edit Thumb form again and click on Restore default Thumbnail.
Users can add a description to any type of item. Bookmarks that have a description have an icon on the left side.
To add a description click on the Add description button when adding or editing an item.
Descriptions can also be shown directly on the page, under the item.
To enable it click on the category settings and click on Turn on descriptions
To turn on descriptions for all the categories in the page, click on the layout and then on Turn on descriptions.
Since there are no categories in categories mode: none you can turn on descriptions only through the method above.
Clicking on the expand button in the bottom right corner will expand the description.
Users can add up to five custom fields to a description. Custom fields can help you when you have fixed values to fill in.
Example: you are collecting the websites of the local gyms in your area. You are interested in filling in the price and the phone number of each of them, instead of filling it as a free text, you can create two custom fields: "price" and "phone". This way it looks more organized.
The copy custom fields button will copy the custom fields without the values to all the other items in the same category.
Users can duplicate any existing page. This will create a new page with the contents of the original page.
Simply open the Import/Export page and choose which page you would like to duplicate.
Fill in the name of the new page and click on Copy page
Note: changes on the new page will not affect the old page.
If you have the Pro subscription and you are logged in with the Editor user, you will be able to choose if the new page will belong to an organization or to you personally.
Users can copy a page from their own user to another user on FavSync. This is useful when you need to duplicate users or a copy the content of your page to another user for one time.
Note that this will not share or synchronize the page, it will actually duplicate the data. Changes made on the new page (destination) will not affect the page from where it is copied (origin).
Simply open the Import/Export page and click on Copy pages to another user.
Fill in the e-mail address of the destination user and click Copy.
The destination user will receive an e-mail address. The user has to be logged in to FavSync and has to click on the validation link to confirm the coping procedure.
FavSync Public
General info
PurposePublic page allows users to publicly share the content stored on this page. After it's activated a unique URL for that page will be generated. Anyone (non-FavSync users also) can access the public page, by opening the URL.
Open page settings, by moving the mouse over the page title and clicking on the settings icon. Afterwards, switch to Public page. You need to activate the public page first, before it will start working.
Read the rest of the sections to understand the rest of the options of the Public Page.
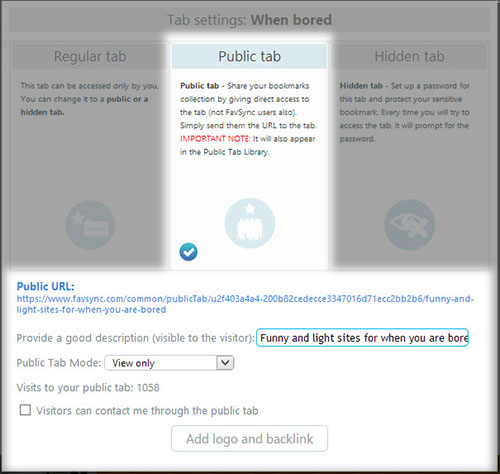
The author field allows users to specify the name that will be shown as the publisher name.
Public page visitors permissions has three modes:
View only - visitors cannot add items to your public page.
Add items - visitors can add items to your public page.
Add items, but I will have to approve them first - visitors can add items to your public page, you will have to approve them before they will appear on the public page.
Optionally allow visitors to contact you via an e-mail form (your e-mail stays unpublished) by checking Visitors can contact me through the public page
Adult contentPlease use this checkbox to specify that your public page contains ANY adult content. The public page will still appear in Google results, it will just be marked as adult.
Publish privately vs. Publish to PPLLastly choose which way you would like your public page to be published:
Publish privately will not post your public page anywhere and cannot be found via Google, only users that have the public URL will be able to access the public page.
Choose this in case you would like to share the public page with a group of people you know.
Publish to PPL will also publish your public page to the Public Pages Library and the page will appear in Google results. Choose this in case you would like to get as many visitors as possible.
On the top of the Public Page you can see the amount of visits, ratings and social likes.
Visits are counted every time someone is visiting the public page. The visits don't have to be unique.
Rating is the average rating given to the public page by the visitors. Every visitor can vote only once.
Social likes are provided by ADDTHIS plugin and are not regulated by FavSync.
The Public Pages are ordered by the average rating and the amount of users that rated the Public Page.
FavSync preserves the right to regulate the ratings, in case of system abuse.
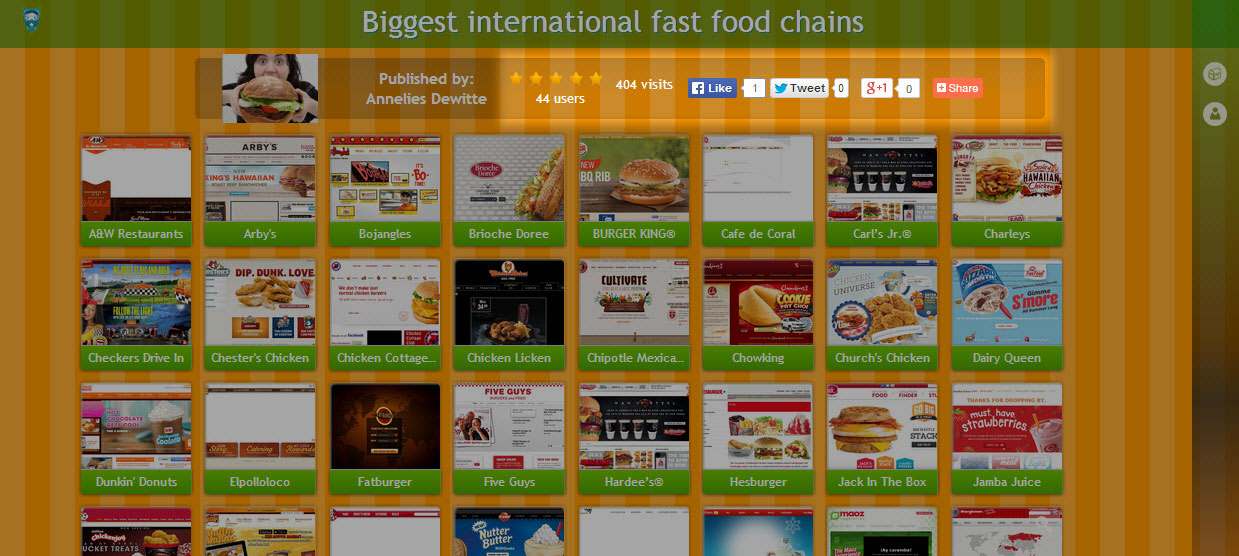
Public Pages Library is the place where you can find great public pages of other users.
Add to FavSync option adds the Public Page as one of the pages in your FavSync account. This way you can access the page quickly from your FavSync account.
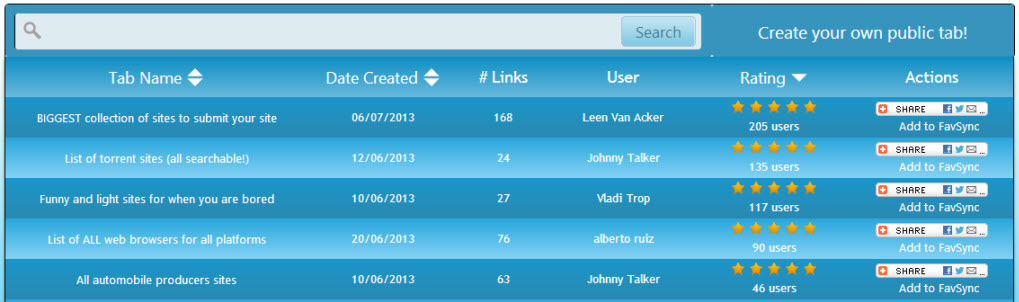
Users can provide up to 5 additional URLs that will redirect to the same Public Page.
By default the URL of the Public Page consists from the title you created (slug URL). In case you would like to have a shorter URL or just another URL you can create additional URLs that will redirect to the original URL.
Example:
The title of your Public Page is: "Interesting stuff about the world"
The URL of your Public Page will be: https://www.favsync.com/pp/interesting-stuff-about-the-world
You would like to have a shorter URL, for example: https://www.favsync.com/pp/world-interesting-stuff
Yes, you can fill in any name in the Author field.
Affiliate links and spammingIt is allowed to use affiliate links or backlinking your website on your public page.
However, your page still has to look natural and provide value to the visitor. Just filling it up with affiliate links, filling it with just random links or lots of links to your website will cause the page to become unpublished.
We will demote a public page to a regular page, when it is clearly for spamming purposes.
Upcoming stuff
AnalyticsUsers will be able to see analytics about their visitors, which bookmarks are most clicked, who are the visitors, their sources and more.
Promote your website or brand
How does it workFavSync allows you to promote your brand and website via the public page.
Here's how it works:
1. Create a public page and collect relevant andquality content in the area of your expertise.
2. Upload a logo with a backlink to your website. Logo will be shown at the top of the public page.
3. Share the public page with the relevant audience (forums and other communities).
4. Visitors will find your public page useful and will share it with others. All the visitors will be exposed to your branding. By providing visitors with useful content you are increasing your credibility and some of the visitors will visit your website, by clicking on your logo.
5. Your public page will also appear in Google results and in our Public Pages Library.
Optionally: create more interaction by allowing users to add content to your public page.
The most important fields in the public page activation are Title and Description. The title will be shown on the top of your public page, as a part of the URL to your public page, as a title in the metadata and will affect greatly Google ranking and how it will appear in Google results.
You can always change the title at a later stage, every time you do it, it will change the URL.
Note that you might lose all your Facebook likes and Google+ +1s when changing the title also.
A good title is a specific title, but not too long. Think what would users search on Google to end up on your public page.
Good title examples:
Everything about PS4
Sites for movies reviews
All employment sites in US
Bad examples:
PS4
Movies
Employment Sites
Descriptions helps users understand more in detail what your public page is about, it will be stored in the meta-description and also has effect on how people can find your public page.
Users with the knowledge of CSS can customize their public pages further, by applying their own colors, images and etc.
Adding a backlink and a logoIf you would like to promote your brand and your website with the public page, you can upload a logo (or any other image) of your website and a backlink to your website by clicking on Add logo and backlink
Learn more about how you can promote your website via the public page in the next section.
Earn Money
PurposeOne of the reasons you might want to create a public page is to earn money through it.
Unlike other online services that allow you to earn money and require certain skills, with FavSync Public you can earn money by simply collecting quality content on the web.
FavSync allows you to earn money online via the public page.
Here's how it works:
1. Create a public page and collect relevant and quality content in the area of your expertise or on a popular topic.
2. Share the public page with any relevant audience (forums and other communities).
3. Your public page will also appear in Google results and in our Public Pages Library.
4. Visitors will find your public page useful and will share it with others. All the visitors will be exposed to the ads on your page.
5. FavSync shares its AdSense revenues from the pages you’ve created with you. You will receive 75% of the revenues with a free account, when upgrading to premium, you’ll get as much as 95%.
A good public page is:
- About a specific topic
- Contains different types of content on it (bookmarks, articles, images, videos and etc.)
- Has content from different sources
- Manually picked best content
- Has a logical structure
- A good public page will assure that users stay on it longer and that they will share your page with others.
- Optimizing your public page for SEO (Search Engine Optimization) is an important part of making a good public page and can help you in getting significantly more visitors.
- Check out our SEO tips on creating a good public page.
In order to turn your public page into more a more profittable one, besides
collecting quality content, you should also pay attention to search engines optimization (SEO). The
way to do that is to consider SEO strategies as an integrated part of your page.
If your public page is visible for Google and other major search engines, your ads revenues will significantly increase.
Here are some tips from our SEO expert:
1. The most important SEO tip is choosing carefully the keywords you want your
page to focus on.
We recommend choosing a niche for each public page, rather than creating a page and display content from a wide range of areas.
We actually recommend creating a page for each topic of interest.
2. Use Google's Keyword Planner to see which keywords are more popular.
Don't
target very competitive keywords, as even if they are more popular, the
competition is fierce.
That does not mean you should not choose a topic you like, these tips will just help you choosing the right keywords for the title of your page.
3. Focus on long tail keywords (at least 3-4 words long) that have a reasonable number of average monthly search queries.
4. When using the Keyword Planner, make sure you look at the "exact" number of queries and not the "broad" number of queries.
5. Once you have chosen the keywords you want to focus on, you should use them as much as possible on your public page, but don't exaggerate to an extent that it does not look natural.
Search engines are able to identify when keywords are overused.
7. Use multiple keyword combinations instead of just one - for example, if your page is about "electric guitars", don't use just that all over the page.
You can also use "electric guitars for beginners", "types of electric guitars", "electric guitar brands", “Gibson guitars" and etc.
This way everything will look more natural and will be more SEO friendly.
8. If your public page contains written text as well, make sure you put the keywords of interest in Bold or Italic. You don't have to do that for all of them, but just for a few of them.
9. Share your public page on all your social media accounts.
Sharing it on Facebook, Twitter, Google+, Pinterest and etc. will help your page to be more visible for both visitors and search engines.
Social signals will weigh a lot in obtaining a good SERP, as well as getting more traffic.
You can convince your friends to share your public page on their social accounts as well, in order to increase your social presence.
Nowadays, Google SEO rating is very focused on the social presence, so the benefits are significant.
10. It is also very important in optimizing your page for search engines is creating quality backlinks.
The quality and the number of backlinks will determine the ranking that Google and other search engines will assign to your page.
As a general rule: backlinks from websites related to your topic weight much more than free for all backlinks
11. Get backlinks from websites related to your topic - Google gives much more credit to a website that receives many backlinks from other websites related to the same topic.
For example, if your public page is about "cake recipes", you should try getting backlinks from websites within the food industry.
A single backlink from another website that provides cake recipes would weigh even more than 10 links from other non related websites.
In order for you to keep track of your AdSense stats, FavSync is importing stats directly from Google Analytics, every day at 12:00PM. The results are showing data until the end of the previous day, the current day is not included in the stats.
What do the stats stand for?
Page views: number of times your page has been viewed
Visits: number of unique visits to your page
Ads Impressions: number of times ads have been shown
AdSense Revenue: the revenue that has been generated from the shown ads
Your AdSense revenue: the revenue that you will receive from the shown ads
YOUR BALANCE THIS MONTH: the amount that you already earned for the running month
You can choose to see the stats based on these time period:
Yesterday: stats for the previous day only
This month: stats for the running month
All the time: stats from the moment you’ve published your page
How will you get paid?
Payment is being sent to your PayPal account every 11th of the month.
Payments are always made for the previous month.
You will need to provide a PayPal account, you can do that in the public page activation form.
.
FavSync Public is a free service. You will always receive 75% of the AdSense revenues.
If you want to make the most out of your efforts and earn even more, upgrade to a premium account to get as much as 95% of the revenues.
You can always try FavSync Public with a free account and upgrade to a premium subscription later.
Note that if a premium subscription is bought in the middle of the month, you will receive 75% for that month and 95% starting on from the next month (after upgrading to premium).
By upgrading to a premium subscription, you also enjoy all the following features:
- your own logo and backlink to your website
- possibility to completely brand your public page with custom CSS
- the use of multiple (and shorter) URL’s that will redirect to your public page
- appearance at the top of the FavSync Public Pages Library
Referral program
PurposeUsers can earn 2% of the revenues from the public pages created by their referrals.
A referral is a user that has signed up through a referral link.
Every registered user on FavSync has its own referral link.
Share the link with your friends, on your blog or any other place where users might be interested to sign up on FavSync.
Users that click on your referral link and sign up afterwards will become your referrals.
From then on receive 2% from the revenues generated by your referrals. The 2% are deducted from FavSync share, not from your referrals'. In other words your referrals will still get 75% (or 95% with premium subscription) of the revenues.
You can find your referral link on the Referrals page.
On the Referrals page you can find information about all your referrals and the public pages they have created and your referral link.
The Referrals table contains two types of entries:
- Referrals that have no public pages with the revenue sharing option enabled, will just have the name of the user and a "No public pages created yet" message
- Referrals that have public pages with the revenue sharing option enabled will have an entry per public page.
Example:
Referral1 - No public pages created yet
Referral2 - A name of a public page
Referral2 - Another name of a public page
Referall3 - No public pages created yet
For each entry you will find information about the amount of revenues the public page generated this month and for all the time since its creation. Next to it you will see your 2% revenue.
Every registered user on FavSync has its own referral link.
When someone clicks on your referral link, a cookie is stored on their browser. Afterwards when the user will sign up they will automatically become your referral, even if they closed FavSync and opened it at another time.
You can find your referral link in the Referral page.
The referral link also appears at the bottom of any public page you create. Therefore, users that will sign up on FavSync through the your public page will also become your referral.
No, you can use FavSync just to earn from referrals.
However, we do encourage users to create at least one public page, to get to know the product they promote better.
Moreover, some of the users visiting your public page will click on your referral link.
How will you get paid?
Payment is being sent to your PayPal account every 11th of the month.
Payments are always made for the previous month.
You will need to provide a PayPal account, you can do that in the Referrals page.
.
FavSync Hidden
Hidden Page
PurposeHidden page allows you to store sensitive content under an extra password.
Every time you will access the page it will require a password for it. FavSync account password and the hidden page passwords are not the same.
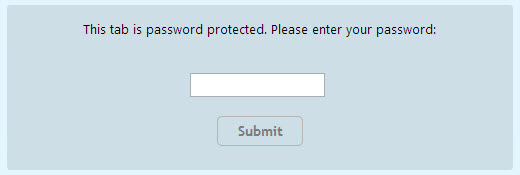
Open page settings, by moving the mouse over the page title and clicking on the settings icon. Afterwards, switch to Hidden page and setup a password. A confirmation e-mail will be sent. You have to validate the hidden page before it will become active.
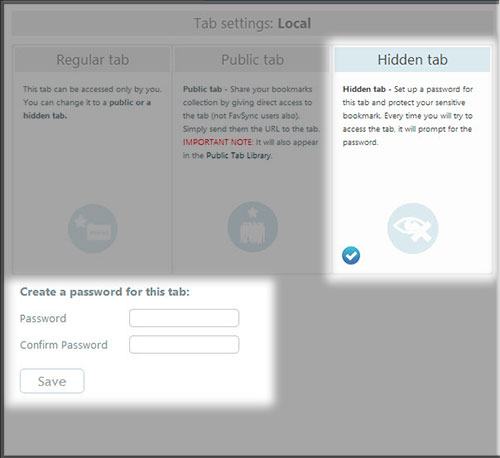
You can add an item to the hidden page manually by clicking on the Add Item button on the hidden page itself, by moving an item from another page or via the add-on.
When adding via the add-on, click on Choose category and then Show hidden tabs. You will need to provide the password for the hidden page. In case you have more than one hidden page, you can provide a password for any of the hidden pages. This functionality is currently available only in Chrome.
You can also drag an item from another page to a hidden page. There will be no preview of the page and the item will be inserted last.
To keep it hidden, items from a hidden page do not appear in all searches
Works same way as a regular pageInside the page, the functionality and the UI works the same way as on a regular page.
Hidden page not to appear in the pages listIf you would like the hidden page not to appear also in the pages list, open the layout and uncheck the Show hidden page and click Apply. For the hidden page to appear again, you will need to check Show hidden page
Premium
One way encryptionWe believe that a hidden page should be completely hidden, even from us. One way encryption provides not only an extra layer of security, but also encrypts the data stored in the hidden page in such way that it's not even accessible to us. It is as personal as storing it on your own PC.
You need to buy a premium subscription to use this functionality.
When creating a password, the data stored in the page will be encrypted based on the created password and will be unique. Because the encryption is unique per password, the data stored in the page can be decrypted, only by providing the password. Even with access to the database (where the data is stored), without knowing the password it will not be possible to decrypt and access the data. If you lose your password, you can recover it only by answering the secret question
Recovering lost passwordWhen creating the hidden page, you must ask yourself a secret question and answer it. This will be the only key to recover the access to your hidden page, If you lost the password.
Please note that if you lose the password and don't have the answer to the secret question, FavSync will not be able to decrypt and recover your data and it will be lost. That is the only way to ensure that the data can be accessed only by the password owner.
Please choose a secret question and answer it in a way you are sure you will not forget.
You can buy a Hidden Premium subscription for one year by switching to hidden page in the page settings of any page and clicking on the BUY NOW button at the bottom.
Payment methods and invoicingWe accept all the major credit cards and Paypal.
Since we are using Stripe and Paypal as our payment providers, FavSync does not have access to your credit card information. You can pay safely without worries.
If you would like to test the hidden page before buying, you can use the regular hidden page for free and switch to the encrypted hidden page, whenever you are ready. The functionality is exactly the same, with the difference that the content is encrypted, therefore no trial period is required.
FavSync Pro
FavSync Pro general info
The goal of FavSync ProFavSync's Pro goal is to provide an easy to setup, customizable and collaborative portal for organizations with a SSO functionality.
In a glance users within the organization are able to:
- Access all the websites they need faster
- Access all the websites they need without filling in (or even know) their username and password
- Easily provide new users with access to all the useful content
- Collect content together as a team
- And more..
Since most organizations use the web on a daily basis, people inside the organization are exposed to lots of data and online services that they need to store and access easily and quickly. If accessing it will not be easy enough, it might lower their productivity and cause users to stop using it completely.
Portal allows users to access everything they need on the web easily and from one centralized place and gives them an overview of all the data they need at that moment.
FavSync Pro can be useful for your organization in the following cases:
- Users inside your organization need to collect online content together.
- Users inside your organization would like to have an overview about all their online activities.
- Users inside your organization need to access at least couple of online services on a daily basis.
- Users inside your organization need to access the content from different devices.
- Setting up and providing a new user with access to everything they need takes too long.
- You would like to give access to certain online services to some users without revealing them the username and password.
- Users need to manage too many usernames and passwords.
- Users inside your organization are storing content on their personal PC. This creates a difficulty in managing content on an organizational level.
- Users inside your organization are using different services to store different type of content and accessing it in different ways.
- Users inside your organization have difficulties finding the content they need or finding the websites they need quickly.
While FavSync is aimed for personal use, FavSync Pro is aimed for organizations.
On FavSync Pro the administrator manages the portal and provides the users inside the organization with everything they need:
- Administrator controls the pages, categories and items that are shown to all the users within the organization.
- Administrator can provide users with access to the online services they need easily by storing the login information inside the bookmarks. Users do not need to know or manage their usernames amd passwords.
- Users have access to organizational items as well as to their personal items. Organizational items are managed by the administrator, while personal items are managed by the user himself.
- Administrator can show or hide selected categories to selected users, this way showing users only the categories they need to see.
- Administrator can allow editing selected categories to selected users, this way users can manage their own categories and collect useful items together.
- Custom CSS allows you to create your custom branded portal, with your logo, colors and etc.
- Premium Hidden is included in FavSync Pro and allows you to use one-way encryption.
Yes, every user can store their own content. This content is not managed by the administrator.
Is the functionality limited during the trial period?No, all the functionality is accessible during the trial period.
More info about the trial period can be found here.
Starting with FavSync Pro
Basic functionalityTo learn the basics please refer to the Start with FavSync (not FavSync Pro) section, where you can learn how to add, edit, drag, delete, import and access your items. As well as about pages, layout possibilities and FavSync add-on.
This section only refers to FavSync Pro functionality that does not exist in the regular FavSync.
The first user of your organization is the administrator user. All the pages, categories and items of this user will also appear to all the users in that organization.
The administrator user should not contain personal items, as they will appear also for other users.
The administrator can completely control the content that will be shown to users, which users will have access to the portal the logins and more.
You can have only one administrator per organization.
Use the editor user to create personal pages (they will not appear to all the users in the organization), where you can store your personal data while still having the administrator permissions.
The editor user is a secondary administrator user
The editor user is useful for users who want to manage the organization, while being able to store personal content also.
The editor have almost all the permissions of the administrator, except creating pages for the organization.
Pages created by the editor will be personal.
You can have an unlimited number of editors per organization.
In the admin panel the administrator can add/edit/delete users.
Any user added will have the administrator pages, categories and items.
Read more about the admin panel here.
If you are already a FavSync user, but not Pro, you can upgrade to Pro by opening the FavSync Pro landing page and clicking no the Upgrade to Pro button.
Your user will be upgraded to Pro instantly and a 30 days free trial will start.
Your user will become an administrator and the pages stored on your user will become organizational.
To store personal pages, you will need to create another user as an editor.
You can use the copy to another user function to easily split the pages between the organization and the personal use.
Admin panel
Adding a new userTo add a new user click on the Add User button and fill in all the details.
New users created through the admin panel are not required to activate their account via e-mail confirmation.
To add an existing FavSync user to your organization click on Add existing user and fill in the e-mail address. An activation e-mail will be sent to that user. After activating the user will become part of the organization.
All the existing pages, categories and items of that user will stay as their personal.
To edit user details and password click on the Edit button next to the user.
Even though administrators cannot see users' passwords, they can edit them.
Note that FavSync will not send a notification to the user about the changes in the login details.
Users can also change their own password through the account settings.
To delete a user click on the Delete button next to the user
If the user has personal items then the user will be not be deleted completely, instead they will be disconnected from the organization. An activation e-mail will be sent to the user, afterwards the account will become a regular FavSync account
Users can also delete their own accounts through the account settings.
For a quick setup of a new user, you can copy category permissions from one user to another.
To copy category permissions click on the Copy permissions from next to the user to whom you would like to copy. Then choose the user from whom you would like to copy.
Note that the existing permissions of the user will be completely deleted and overwritten by the permissions of the user from whom they were copied.
Invite user will send an e-mail invitation to the user with instructions how to login to FavSync and the username. We do not send password by e-mail, because of security reasons.
You are not obliged to invite the user for him to use FavSync.
Administrators can completely customize the look of the organizational portal. The custom CSS will affect all the users in the organization.
Common uses are changing the FavSync logo to the organization's logo, changing color schemes to company color schemes.
Category Permissions
PurposeAdministrator can set different permissions for every user per category.
This way administrators can easily provide users with access only to the categories they need and allow team leaders to manage their own categories.
Edit - allow the user to add/edit/delete items from the category
We recommend allowing team leaders to manage their own categories.
View - shows/hides the category for the that user.
We recommend to show only the categories that are necessary for each user.
The Category Permissions panel gives you a quick overview of all the categories and the permissions each one of them has.
You can quickly filter by category name, page and user and change the category permissions.
You can access the Category Permissions through the User menu on the right panel.
By clicking on the users button in the right menu, you can see the list of users in the organization, their last login and see how that FavSync page look to a specific user.
Since every user has different permissions to different categories and pages, this way you can easily see what is visible and what's not for a specific user.
Only administrators and editors can use this function.
Trial period
PurposeTrial period allows you to test FavSync Pro functionality and helps you make a decision to buy FavSync Pro subscription.
Trial period limitationsThere are no limitations during the trial period. You can use all the functionality and add as many users as you need.
How long is the trial?The trial is 30 days.
Can I prolong the trial?Yes. If 30 days were not enough to make a decision, please contact us and explain us briefly why you would like to prolong your trial. We will do our best to assist.
What happens to my items after the trial ends?Until a decision is made to prolong your trial or until you purchased a FavSync Pro subscription, access to your account will be suspended.
You can export your bookmarks to a HTML browser format file (to import it to your browser) at any moment during the trial.
If you need to export your bookmarks when the account is already suspended and do not wish to buy FavSync Pro subscription, please contact us and we will provide you with a temporary access to the account so that you can export your bookmarks.
No, we do not require a credit card or any type of commitment. You can make your decision at the end of the trial.
Payment
How to buyClick on the Buy now button in the admin panel. Fill in the billing information and choose a payment method. After payment is confirmed (usually instantly) you will receive an invoice and your subscription will become active.
The minimum amount is 5 users.
Click on the Buy more users button in the admin panel and choose the amount of users.
When buying extra users there is no minimum requirement on the amount of users.
For any new user added after the billing period has started, the payment will be calculated on a daily rate, based on 0.095EUR/day per user or 0.115USD/day per user. This way, the billing for the new user will end together with the billing period for the rest of the users, to avoid having different billing periods for different users in the same organization.
We accept all the major credit cards and Paypal.
Since we are using Stripe and Paypal as our payment providers, FavSync does not have access to your credit card information. You can pay safely without worries.
Because FavSync provides a long trial period, currently we do not offer refunds. We believe that a month is enough to make a decision, so there is no need for refunds afterwards.
However, we are ready to review special cases. In that case, please contact us.
Moreover, based on our Terms and Conditions in case of service failure partial refunds are possible. Please read more about it in our Terms and Conditions.
Single-Sign-On (SSO)
General info
PurposeFavSync SSO allows users to login once to FavSync and get automatically logged in to all the online services they use, saving users the hassle of remembering or inputting passwords.
In order to be logged in automatically to all your online services, you need to store your login information inside the bookmarks on FavSync.
Every time you open a website that has the same domain as one of your bookmarks, FavSync add-on will automatically inject your login information into the login fields and will log you in automatically.
Login information is the username and password you use to login.
SSO is currently supported only in Chrome and Firefox when FavSync add-on is installed.
The Password manager is a secure page, where you can see all your logins in one shot (passwords are hidden), add, edit, delete existing login and copy the passwords stored, if needed.
You can use the filter on top to filter by title, domain and login (username).
Use the buttons next to each login information to edit, delete, add another login or copy the password to clipboard.
To add login information to a bookmark through the item form follow these steps:
Click on Add Item or Edit Item, make sure the chosen item is bookmark and fill in the URL.
Afterwards click on Add login information and fill in the title, the username and the password.
The domain is already filled in, based on the URL provided earlier.
Title is just a display name, to help you recognize this login information later. This field is optional.
Username and password are the login information that will be used to autologin you to this website.
Note that login information is stored on the domain itself, not on the exact URL of the bookmark.
Example: you are adding a bookmark with the following URL: http://www.facebook.com/profileID/22444444
In this case the login information will be stored just for facebook.com
When editing the bookmark later on, it will be indicated if this bookmark already has login information, based on the domain stored in the URL.
To add login information to a bookmark through the password manager follow these steps:
Click on User menu (in the right bar) and click Password manager.
You will have to fill in your password to access this page.
Afterwards click on Add login information and fill in the domain, title, the username and the password.
You can fill in the domain without http and www., these will be removed anyway and make no difference.
Title is just a display name, to help you recognize this login information later. This field is optional.
Username and password are the login information that will be used to autologin you to this website.
Note that login information is stored on the domain itself, not on the exact URL of the bookmark.
Example: you are adding a bookmark with the following URL: http://www.facebook.com/profileID/22444444
In this case the login information will be stored just for facebook.com
Users can choose the action that will be performed when login information matches:
Autologin - will automatically fill in the username and password and will login the user.
Autoinject - will automatically fill in the username and password but will not login the user.
No action - no action will be performed. Use this option when you just want to store the login information to retrieve it later.
In case you have more than one account on the same website, you can store multiple logins for the same domain.
You can do this through the edit item form and through the password manager.
In both cases you can find it in the Edit login information section.
When accessing the website and more than one login information is detected, a star will appear in the username field allowing you to choose which login information to use.
You can store login information on a specific subdomain. Moreover, login information stored on a subdomain has priority above login information stored on a domain.
Note: subdomain is x.website.com
Domain is website.com
Example: you would like to store login information specifically on x.domain.com and not on domain.com.
In that case when you open domain.com in your browser the login information will not match. It will only match when x.domain.com is opened.
In case you have login information on both x.domain.com and domain.com, only the x.domain.com will match, because it is the more specific one.
Note that it does not work the other way around: In case you store login information on the domain it will also match when you open the subdomain. This is intentional, since in most cases you can use the same login information for all the subdomains of the domain.
The examples provided above are for specific needs, where each subdomain is usually a completely another service.
FavSync add-on also allows you to generate a unique and very secure password when you sign up to new online services.
In the registration form you will see a + icon in the password field. Click on it and choose the strength of the password and click on Generate
In case login information was not injected and you have checked that the domain is matching, the action is set to Autologin or Autoinject and FavSync add-on is installed, it could be an unusual login form.
Unfortunately some login forms have an unusual HTML structure and the login fields are not identified properly. In that case please let us know.
SSO for organizations
PurposeThe SSO for organizations provides IT administrators control over all the organizational logins in one place.
The IT administrator can easily grant access to all the users inside the organization to the online services they need, without revealing the actual username and password.
The main benefits of using SSO for organization:
- Users do not need to manage the login information on their own, so there is no risk of them forgetting or losing it and no time is wasted on retrieving a lost password. The only thing users will have to know and remember is how to login to FavSync.
- Since users do not need actually need to know the login information, when a user leaves the organization, the login information stays safe and does not leave the organization.
- Users do not need to fill in the username and password every time, saving them time and frustration.
- New users in the organization can easily get access to all the online services they need much faster.
- IT administrator has a much better control over all the logins, since it's stored in one centralized place.
To learn the basics about SSO please refer to the Single-Sign-On General info section, where you can learn how to add, edit, delete, add multiple logins, subdomains and about the password manager
This section only refers to SSO for FavSync Pro functionality that does not exist in the regular SSO.
To learn how to add login information in general please click here.
This section only refers to SSO for FavSync Pro functionality that does not exist in the regular SSO.
After filling in the domain, title, username, password and action you can choose who will have access to this login information:
All the users of the organization - all the users in the organization, including any new user that will join the organization.
Choose this option when you have one account on that website for all the users in the organization.
Example: you have only one account on the website odesk.com.
Selected users - choose specific users that you would like to give access.
This option can be useful in two cases:
1. Same as above, but you would like to give access only to certain users inside your organization.
2. When every user has their own account on that website. In that case you need to add login information for each user separately, choose selected users option and select the user you would like to give access only.
Myself in organization - only you will have access to this login information.
Myself privately - this option only exists when you are logged in with an Editor user. Since the Editor user can have both, organizational logins and personal logins, use this option when you would like to store the login information for yourself personally.
When storing login information on users inside the organization you can choose to let them manage it on their own or not.
This can be useful when specific users are already managing their own usernames and passwords for specific online services.
Users can also store their personal login information. When adding login information a user can choose if the login information will belong to the organization or will be personal.
Administrators do not have access to users' personal login information and it also does not appear in the password manager of an organization.
Users can have multiple logins. You can read more about this here.
This also works in a case where a user has personal login information and organizational login information on the same domain. In that case the user will be able to choose with which one to login.
The Password manager is a secure page, where the administrator can see all the stored login information in one shot (passwords are hidden), add, edit, delete existing login and copy the passwords stored, if needed.
Use the filters on top to filter by title, domain, login (username), which users have access and by Personal/Organization option.
Use the buttons next to each login information to edit, delete, add another login or copy the password to clipboard.
Yes, in order for the SSO to work the FavSync add-on needs to retrieve the login information and inject it into the login fields. Therefore FavSync add-on must be installed in Chrome, on every users' PC.